Host multiple websites on a single server. (Docker)
Once you get into web hosting, the chances are high that at some point you will be interested in hosting multiple websites on a single server. While the setup might be complex with LMDS you should get it going in a few minutes.
LMDS will allow you to launch a fully functional Web Server in one click and host as many websites as you like using NGINX Docker containers.
If you're not familiar with LMDS, please check out this article on LMDS overview first. If you're just looking to deploy it, follow this FAQ on how to do so. When deploying the LMDS system, the web server option is one of many choices available in the menu.
In this article, we will only look at the WebServer functionality of LMDS.
Currently WebServer Stack include:
- NGINX
- PHP-FPM (FastCGI) v8.2
- MariaDB
- php MyAdmin
The entire stack can be built with one selection in the LMDS menu. Scripts will create or update the existing docker-compose.yml file, which will be used to build a WebServer Stack. Scripts will create a folder structure and place required config files in it - these config files can be later adjusted to meet your requirements.
The script will also install sftpd service (sFTP Server) so you can easily upload website projects into relevant Nginx instances.
The script will build two independent Nginx containers to run two independent websites on a single host. These Web Servers will be available on ports 60101 and 60102. Initial build will create the folder structure shown below, which can be later multiplied to run more Nginx servers if needed.volumes
└── WebServ
├── nginx01
│ ├── config
│ │ └── conf.d
│ │ └── site.conf
│ └── www
│ └── html
│ └── index.php
├── nginx02
│ ├── config
│ │ └── conf.d
│ │ └── site.conf
│ └── www
│ └── html
│ └── index.php
The server has been completely configured to execute PHP code of version 8.2 through FastCGI.
Web Server deployment also includes a Docker container for MariaDB and phpMyAdmin to manage this database using a browser.
You do not need to change any config files after initial deployment. LMDS WebServer is ready to go immediately after being created.
Just paste LMDS WebServer IP address in to a browser, followed by one of two port (60101 and 60102), and if all went well, you should see similar result to what you see below:
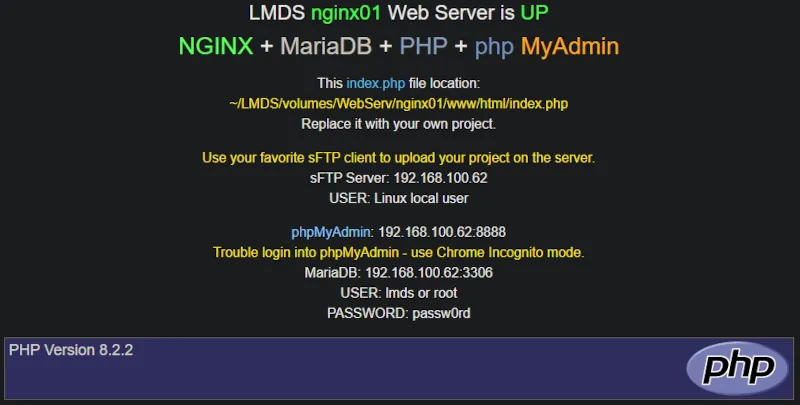
If you see above, LMDS WebServer is ready to host your projects. All what you have to do now, is to copy your project files in to it:
Locations:
~/LMDS/volumes/WebServ/nginx01/www/html/
~/LMDS/volumes/WebServ/nginx02/www/html/
I suggest you use WinSCP to transfer your files in to the server.
How to host more websites on a single server?
After completing the steps in part one, you should have two separate Docker containers running web servers independently.
To create additional Nginx containers and host more websites, follow instructions below.
Duplicate required folders.
Duplicate nginx01 folder by making a copy of it with a different name i.e. nginx03
cp -r ~/LMDS/volumes/WebServ/nginx01 ~/LMDS/volumes/WebServ/nginx03From having below.
volumes
└── WebServ
    ├── nginx01
    │   ├── config
    │   │   └── conf.d
    │   │       └── site.conf
    │   └── www
    │       └── html
    │           └── index.php
    ├── nginx02
    │   ├── config
    │   │   └── conf.d
    │   │       └── site.conf
    │   └── www
    │       └── html
    │           └── index.php
We should end up with this.
volumes
└── WebServ
    ├── nginx01
    │   ├── config
    │   │   └── conf.d
    │   │       └── site.conf
    │   └── www
    │       └── html
    │           └── index.php
    ├── nginx02
    │   ├── config
    │   │   └── conf.d
    │   │       └── site.conf
    │   └── www
    │       └── html
    │           └── index.php
├── nginx03
│ ├── config
│ │ └── conf.d
│ │ └── site.conf
│ └── www
│ └── html
│ └── index.php
Correct config file.
In order for our new web server to work correctly, we have to change its configuration file located in:: ~LMDS/volumes/WebServ/nginx03/config/conf.d/site.conf.
nano volumes/WebServ/nginx03/config/conf.d/site.conf
Replace nginx01 in two places with the name of the duplicated folder (in my case, nginx03), and save the file.
server {
    listen 80;
    server_name nginx03;  # <- here

# Log files for Debug
error_log  /var/log/nginx/error.log;
access_log /var/log/nginx/access.log;

# web root directory
root /var/www/html/nginx03;  # <- and here
index index.php index.html;

location / {
    try_files $uri $uri/ /index.php?$query_string;
    gzip_static on;
}

# Nginx Pass requests to PHP-FPM
location ~ \.php$ {
    try_files $uri =404;
    fastcgi_split_path_info ^(.+\.php)(/.+)$;
    fastcgi_pass php-fpm8:9000;
    fastcgi_index index.php;
    include fastcgi_params;
    fastcgi_param SCRIPT_FILENAME $document_root$fastcgi_script_name;
    fastcgi_param PATH_INFO $fastcgi_path_info;
    client_max_body_size 256M;
}
}
Update docker-compose.yml
Now add another Nginx container declaration to docker-compose.yml file.
nano ~/LMDS/docker-compose.yml- Locate the following section in the
docker-compose.ymlfile and duplicate the container declaration by copying and pasting it below in the same file. - Next, change all references in the copied part from
nginx01with a name you gave to the folder while duplicating it above, in my case it will benginx03. - Change
container_nameby giving it a distinct name for me next server container will be calledWeb-Serv3, then change a port number to any you like, which will be used later to communicate with the Nginx container, in my case I used port60103. See the example below.
from:
#######################################
# NGINX Servers (WebServ NPMP)

  nginx01:
    image: nginx:latest
    container_name: Web-Serv1
    restart: unless-stopped
    tty: true
    ports:
      - 60101:80
    volumes:
      - ./volumes/WebServ/nginx01/www/html/:/var/www/html/nginx01
      - ./volumes/WebServ/nginx01/config/conf.d/:/etc/nginx/conf.d
    links:
      - php-fpm8
    depends_on:
      - php-fpm8
to:
#######################################
# NGINX Servers (WebServ NPMP)

  nginx01:
    image: nginx:latest
    container_name: Web-Serv1
    restart: unless-stopped
    tty: true
    ports:
      - 60101:80
    volumes:
      - ./volumes/WebServ/nginx01/www/html/:/var/www/html/nginx01
      - ./volumes/WebServ/nginx01/config/conf.d/:/etc/nginx/conf.d
    links:
      - php-fpm8
    depends_on:
      - php-fpm8

  nginx03:
    image: nginx:latest
    container_name: Web-Serv3
    restart: unless-stopped
    tty: true
    ports:
      - 60103:80
    volumes:
      - ./volumes/WebServ/nginx03/www/html/:/var/www/html/nginx03
      - ./volumes/WebServ/nginx03/config/conf.d/:/etc/nginx/conf.d
    links:
      - php-fpm8
    depends_on:
      - php-fpm8
-
Locate the following section in the
docker-compose.ymlfile and add another volume path into ourPHP-8-FPMcontainer.
# PHP8 FPN (WebServ NPMP)

  php-fpm8:
    image: php:8.2-fpm
    container_name: PHP-8-FPM
    restart: unless-stopped
    volumes:
      - ./volumes/WebServ/nginx01/www/html/:/var/www/html/nginx01
      - ./volumes/WebServ/nginx02/www/html/:/var/www/html/nginx02
- Added volume path shown below should reflect your structure made above:
# PHP8 FPN (WebServ NPMP)

  php-fpm8:
    image: php:8.2-fpm
    container_name: PHP-8-FPM
    restart: unless-stopped
    volumes:
      - ./volumes/WebServ/nginx01/www/html/:/var/www/html/nginx01
      - ./volumes/WebServ/nginx02/www/html/:/var/www/html/nginx02
      - ./volumes/WebServ/nginx03/www/html/:/var/www/html/nginx03
Save the file and exit, then run:
docker-compose up -d --remove-orphansIf all went well you should see another WebServer being created.
pi@raspberrypi:~/LMDS $ docker-compose up -d --remove-orphans
MariaDB is up-to-date
Recreating PHP-8-FPM ...
portainer is up-to-date
Recreating PHP-8-FPM ... done
Recreating Web-Serv2 ... done
Recreating Web-Serv1 ... done
Creating Web-Serv3 ... done
After configuring your new Web Server, you can access it by pointing your browser to the IP address of your host followed by the port number you declared. In my case, it will be http://ip:60103.
If you need to manage multiple websites, you can create separate Nginx containers for production, development, testing, and more. You don't have to run all the containers at once. Instead, you can spin up the one you need and shut it down when you're done, or keep them running 24/7. This should help you manage your resources efficiently and ensures that your websites are separated and working optimally.
At this point, you have successfully set up all the Web Servers in separate containers. However, each of them has a different port number, which could be a problem while exposing them to the Internet. If you want to make these servers accessible through the Internet, you will need a domain name and a proxy container like Traefik. Traefik will route each specific domain to a specific container and port number, but setting this up is more advanced task. If you are interested in trying this out, you can check out my other article in the FAQ section titled How to setup Traefik 2 on Docker with Cloudflare and Let's Encrypt.

Help me make LMDS better
With your support anything is possible
- Beginner
- Objectives
- Concept
- Hardware
- Hypervisor
- Hypervisor Manager
- Hypervisor Initial Config to be continued...
- Advanced
- My Quiet Lab
- Active
- Depreciated

Build your own Audiobook streaming system
Article will show you how to build Audible like streaming system based on Booksonic - audiobook streaming server and Subsonic phone app that let you listen audiobooks online anywhere you are.
Go to article