How to setup Traefik 2 on Docker with Cloudflare and Let's Encrypt
- How to get a free domain name? (Basic Setup)
- How to configure Traefik? (tlschallenge) (Basic Setup)
- How to proxy containers through Traefik? (Basic Setup)
- Why to get paid domain and where? (Advanced Setup)
- Why to register with Cloudflare? (Advanced Setup)
- How to configure Traefik? (dnsChallenge) (Advanced Setup)
- How to proxy containers through Traefik? (Advanced Setup)
This article may be sometimes challenging to understand due to its technical language. I was trying to make it as self-explanatory as possible. I hope that everyone, regardless of their level of expertise in self-hosting, TLS encryption, proxy implementation, and Docker, will be able to easily understand and follow the instructions, get everything working, and benefit from the secure method of exposing multiple services on a single Docker host to the Internet. This is particularly useful if you want to efficiently host multiple services on a single IP address.
This instruction can be easily adapted for use on any Docker host. I will be deploying the Traefik container using LMDS. However, you can also copy and paste the Traefik definition from below into your own compose file and continue following the steps in this article.
How to get a free domain name?
Ok, there is no such thing as free domain name of your choice, but you can always get a free subdomain instead. Free subdomain will allow you to better understand how all the pieces work together before committing any money to a proper domain registration. Subdomains will be needed, if you want to host multiple services from a single IP on the Internet, as this is what we are trying to achieve in this article.
While using a subdomain, you should start thinking about a proper domain name for yourself if you do not have one already. Finding a good, easy to remember, and available name for yourself on the Internet will take some time and is not that easy. On a side note, I bought my greenfrognest.com domain for about 10 euros and each year it will cost me another 10 euros just to keep it. I am pointing that out just so you know what to expect. Of course, some domains are more expensive than others, but you won't go wrong with .COM or .ORG
Here is an example of how to get a free subdomain, allowing you to start with no upfront costs and follow the article with ease.
Visit FreeDNS and create a free account - despite its outdated look, it still works.
After you are logged in using your newly created account:
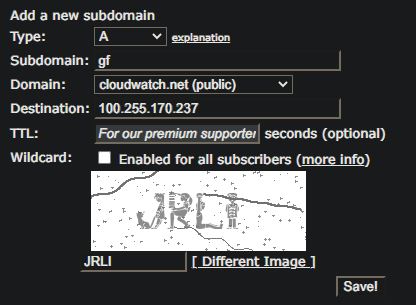
- Look under [For Members:] section and choose [Registry]
- From that long list, select a domain name you like, consider only those with public status
- Provide [Subdomain:] (something short)
- Provide [Destination:] your current home public IP which is: 51.37.174.88
- Prove you are a human by retyping what you see on the image
- Save!
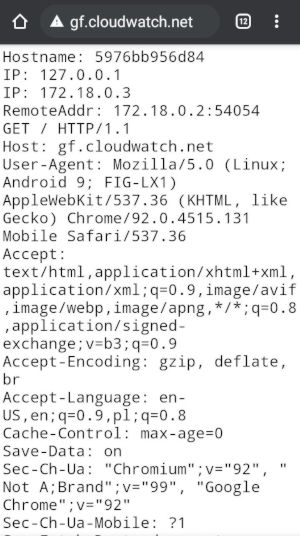
 After registering your new subdomain, make sure to test it with
 nslookup to confirm that it is now pointing to your home IP address.
C:\Users\GreenFrog>nslookup gf.cloudwatch.net
Server: UnKnown
Address: 192.168.100.1

Non-authoritative answer:
Name: gf.cloudwatch.net
Address: 100.255.170.237
Great, we have a domain name pointing at the home IP - now what?
How to configure Traefik? (tlschallenge)
Well, now we will deploy "traefik" and "whoami" containers on Docker host, secure them with TLS, and make "whoami" container available under gf.cloudwatch.net domain from the Internet. This will be a simple example so I can explain some basics. Later on, we will expose another container, and obtain a proper TLS cert for all of them, but first let's start simple.
Before we deploy anything, there are two very IMPORTANT things you have to do first.
- Your home router has to allow communication IN and OUT on ports 80, 443 and optionally 8080 to your Docker server. Before you move further, ensure that you have forwarded these ports on your router.
- Probably, your home router does not have a feature called "NAT Reflection". As a result, if you attempt to access a domain name that points to your home IP from within your home network (LAN), chances are you will not receive any response. You can mitigate this by doing all the testing from your phone while keeping it disconnected from your home WiFi. This way, your phone will behave like any other device on the Internet.
Please copy and paste the code below to the docker-compose.yaml file and save it. Then run the command docker-compose up -d Later on, I will explain the meaning of each line in detail. However, for now, we need to test the accessibility of your site from outside your network. This is the most crucial thing to do before we proceed with anything else.
Make sure to modify the certificatesresolvers.letsencrypt.acme.email and traefik.http.routers.whoami.rule settings to match your own details.
  traefik:
    image: traefik:latest
    container_name: traefik
    ports:
      - 80:80
      - 443:443
    command:
      - --providers.docker=true
      - --providers.docker.exposedbydefault=false
      - --entrypoints.web.address=:80
      - --entrypoints.websecure.address=:443
      - --certificatesresolvers.letsencrypt.acme.email=your.email@email.com  # replace with your email
      - --certificatesresolvers.letsencrypt.acme.storage=acme/acme.json
      - --certificatesresolvers.letsencrypt.acme.tlschallenge=true
      - --entryPoints.web.http.redirections.entryPoint.to=websecure
      - --entryPoints.web.http.redirections.entryPoint.scheme=https
      - --entryPoints.web.http.redirections.entrypoint.permanent=true
      - --certificatesresolvers.letsencrypt.acme.caserver=https://acme-staging-v02.api.letsencrypt.org/directory
    volumes:
      - /var/run/docker.sock:/var/run/docker.sock:ro
      - ./volumes/traefik/acme:/acme
      - ./volumes/traefik/logs:/logs

  whoami:
    image: "traefik/whoami"
    container_name: "simple-service"
    labels:
      - traefik.enable=true
      - traefik.http.routers.whoami.rule=Host(`gf.cloudwatch.net` || `gf`)  # replace gf.cloudwatch.net with you domain name, leave /gf unchanged for now
      - traefik.http.routers.whoami.entrypoints=websecure
      - traefik.http.routers.whoami.tls.certresolver=letsencrypt
What to expect now?
At this point, you should be able to access your test site from the Internet (use a cellular network on your phone to test it, disconnect it from home WiFi). Unfortunately, your phone will suggest not to open this URL as the certificate we received from Let's Encrypt is from a staging server and all the browsers will report it as unsafe - this is to be expected:
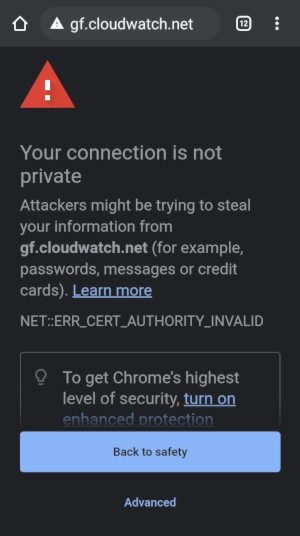
Tap on Advanced
Tap on warning (address bar)
Tap on Details
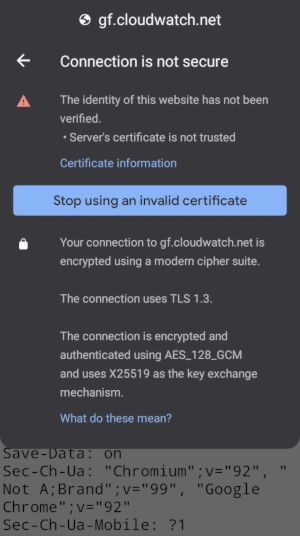
Tap Certificate information
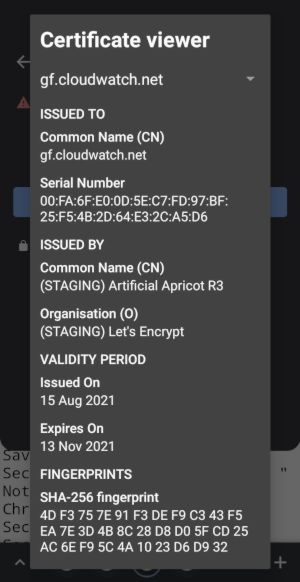
As you can see, I was able to access my site gf.cloudwatch.net, but TLS certificate is not valid due to the fact I used Let's Encript staging server to generate this certificate.
How to change TLS certificate to be valid?
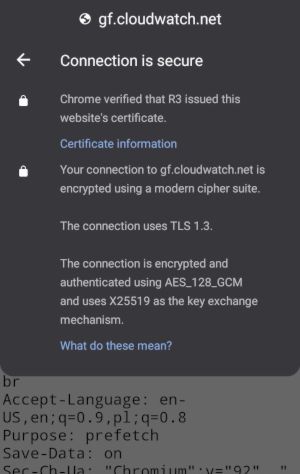
Since we know that our config works, website is reachable by domain name, and we received a test certificate from Let's Encrypt, we should now swap Let's Encrypt staging server to production one by commenting out or deleting below line from the current config:
--certificatesresolvers.letsencrypt.acme.caserver=https://acme-staging-v02.api.letsencrypt.org/directory~/LMDS/volumes/traefik/acme/ folder. If staging cert is there, new one won't be created for that subdomain. Remember also that, if you ever change anything in docker-compose.yaml file, you have to run docker-compose up -d --remove-orphans in order for these changes to be effective.
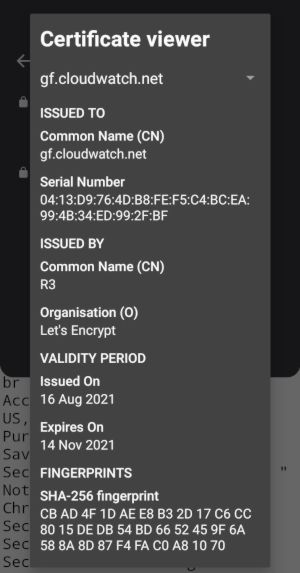
New certificate from Let's Encrypt production server should look different - no warnings.
How does the browser know who to trust?
Well, the idea is quite simple. There are many so-called CA - Certificate Authorities, and Let's Encrypt is one of them. There are root-level CAs and so-called intermediate ones. Root level CAs collaborate with browser developers, such as Chrome or Firefox, to ensure that each browser is aware of their identity. If any certificate is signed by these CAs, browsers can verify the authenticity of the signature by using the so-called chain of trust.
As a domain owners, we can verify each subdomain with CA. This verification process can be done in three different ways - in our case it is fully automated and done by Traffick. If the verification process is successful, CA will issue a certificate that we will use on your server, this certificate loosely says - "We - Certificate Authority confirm that this domain exists and we issued this certificate" (this is of course more sophisticated than that), but now any browser presented with this certificate can check its signature and verify if it came from commonly known CA. This way you won't be able to get a certificate for google.com as you do not own this domain and even if you generate a so-called self-signed certificate for google.com, browsers will know it did not come from a proper CA. This way we have a third-party certification company that browsers trust and they won't give you cert for someone else domain record.
Self-signed certificate or one received from staging server will always cause a warning. Your communication with the web server is still encrypted and secure, but browser is not able to verify if your website is what it claims to be as none of the CAs can validate that. Generating a certificate and encrypting the connection is a common practice for securing communication between you and a server over SSH. However, for public access over the web, you need a proper certificate issued by one of the CAs to ensure that your website is trusted by anyone accesing it.
Above is more or less how it all works, if you would like to know more, I strongly recommend watching videos created by Computerphile. This channel will deliver more scientific approach to TLS and many other things behind all of that. These scientists operate at Bletchley Park in UK, this is the place where Enigma, was cracked during World War II, they know what they are doing and you should also.
How to proxy containers through Traefik?
We will modify our earlier example by adding few things:
- Traefik Dashboard -
http://192.168.100.120:8080 - Sonarr container -
https://sr.cloudwatch.net - Whoami container -
https://gf.cloudwatch.net - Enable
DEBUGon Traefik - in case of something not working, logs to be found in:~/LMDS/volumes/traefik/logs
For below to work, you have to adjust host IP address and use your own subdomain names. I went and registered another subdomain sr.cloudwatch.net with FreeDNS the same way as before. In order to follow instruction below, go ahead and register another subdomain for yourself. I think you can register upto 4 of them there.
version: '3.9'

services:
  traefik:
    image: traefik:latest
    container_name: traefik
    ports:
      - 80:80
      - 443:443
      - 8080:8080
    command:
      - --api=true
      - --providers.docker.endpoint=unix:///var/run/docker.sock
      - --providers.docker=true
      - --providers.docker.exposedbydefault=false
      - --entrypoints.web.address=:80
      - --entrypoints.websecure.address=:443
      - --entrypoints.console.address=:8080
      - --certificatesresolvers.letsencrypt.acme.email=greenfrog@email.com  # replace with your email
      - --certificatesresolvers.letsencrypt.acme.storage=acme/acme.json
      - --certificatesresolvers.letsencrypt.acme.tlschallenge=true
      - --entryPoints.web.http.redirections.entryPoint.to=websecure
      - --entryPoints.web.http.redirections.entryPoint.scheme=https
      - --entryPoints.web.http.redirections.entrypoint.permanent=true
      # - --certificatesresolvers.letsencrypt.acme.caserver=https://acme-staging-v02.api.letsencrypt.org/directory
      - --log.level=DEBUG
      - --log.filePath=/logs/traefik.log
    volumes:
      - /var/run/docker.sock:/var/run/docker.sock:ro
      - ./volumes/traefik/acme:/acme
      - ./volumes/traefik/logs:/logs
    labels:
      - traefik.enable=true
      - traefik.http.routers.thisproxylocal.rule=Host(`192.168.100.120`) # Change 192.168.100.120 to your Docker server IP.
      - traefik.http.routers.thisproxylocal.entryPoints=console,websecure
      - traefik.http.routers.thisproxylocal.service=api@internal
    restart: unless-stopped

  sonarr:
    image: linuxserver/sonarr
    container_name: sonarr
    environment:
      - PUID=1000
      - PGID=1000
      - TZ=UTC
      - UMASK_SET=022 #optional
    volumes:
      - ./volumes/sonarr/data:/config
      - ./media/tvshows:/tv
      - ./downloads:/downloads
    labels:
      - traefik.enable=true
      - traefik.http.routers.sonarr.rule=Host(`sr.cloudwatch.net`) || Path(`/sonarr`) # replace sr.cloudwatch.net with your domain name, leave /sonarr unchanged for now
      - traefik.http.routers.sonarr.entrypoints=websecure
      - traefik.http.routers.sonarr.tls.certresolver=letsencrypt
    restart: unless-stopped

  whoami:
    image: "traefik/whoami"
    container_name: "simple-service"
    labels:
      - traefik.enable=true
      - traefik.http.routers.whoami.rule=Host(`gf.cloudwatch.net`) || Path(`/gf`)  # replace gf.cloudwatch.net with your domain name, leave /gf unchanged for now
      - traefik.http.routers.whoami.entrypoints=websecure
      - traefik.http.routers.whoami.tls.certresolver=letsencrypt
    restart: unless-stopped
After having all adjusted, save the docker-compose.yml file and run docker-compose up -d. If all went well, you should be able to access both subdomains from your phone now.
This is the simplest way of using Traefik and having multiple containers reachable on the Internet by URL.
It's worth noting that the containers that are behind the proxy do not have their ports exposed. This is because the internal IP addresses of the containers may change, and Traefik can dynamically adapt to these changes. Additionally, Traefik is capable of detecting which port on the container is open and using it for communication. This way you do not have to worry about container internal configuration changes - if the labels are set correctly Traefik will pass the traffic to that container on the fly anyway..
Traefik initially might be harder to understand and configure than HAProxy or Nginx, but it pays benefits with certain automation that is not available on other products of such kind.
Why to get paid domain and where?
You might not need a paid domain name to achieve simple tasks of passing communication to few services behind proxy. For that you can use a free subdomain from FreeDNS and call it a day.
If you plan to redirect various services from Docker through Traefik to the Internet, you will need several subdomains. It is always better to have them under a single root name. This is why buying a domain name for yourself could be a good idea. Furthermore, you may want to register your domain with Cloudflare to hide your home IP address. However, Cloudflare registration is only possible with a root-level domain. Although Cloudflare services are free for home users, a proper domain name has to be paid for to use them. The purchasing process for a domain is simple and it doesn't have to be expensive. A proper domain name will allow you to do much more than any free subdomain, and it can be a fun way to try new things. Setting up anything public on the Internet will always require a domain name. You buy one root domain and then you can create hundreds of subdomains underneath if you like, you will only pay for a root domain of course.
Where to but a domain name?
When it comes to purchasing a domain name, there isn't necessarily a significant difference in price across different providers. However, it's worth considering a provider with a good reputation that also offers additional services such as hosting or integration services. This way, you can have all your website-related needs met in one place if necessary.


Why to register with Cloudflare?
Cloudflare is a company that offers various cloud-based services. We will only be utilizing a few of their services, but if you become familiar with their offerings, you could consider using more. When you register with Cloudflare, you will be given Name Server (NS) records, which must be provided to your current domain registrar. This is not mandatory if your current Top-Level Domain (TLD) is supported by Traefik API, which allows domain verification through DNS records. The primary reason for using Cloudflare is to proxy your home IP through their servers to keep your real home IP hidden. By default, Cloudflare will provide you with domain statistics and advanced security protection for your server. Additionally, Cloudflare will cache your server content in the form of a Content Delivery Network (CDN), ensuring that even slow internet at home will not adversely affect your site's performance.
Things to do if you already have a root level domain name (not a subdomain)
From now on, if you decide to go further with the instructions you will need a proper paid domain name, instruction below will not work with subdomains.
- Create an account with Cloudflare
- Register domain name you own with Cloudflare - Add Site
- Update Cloudflare NS records with your current domain provider
- Create "A" record in Cloudflare something.yourdomain.com = IP
- Find CF_API_EMAIL and CF_API_KEY values needed for Traefik dnsChallenge
Creating an account with Cloudflare and registering a site with them is simple. What you might be confused with is all that Name Servers records etc. Let me explain.
When you purchased your domain name, your TLDR (Top Level Domain Registrar) created a record with your domain name in their database for "everyone" to see. Later on you will associate an IP address with your domain name and maybe create a few subdomains "A records" with different IPs pointing to other servers etc. All these IPs will be stored in TLDR database for every DNS in the world to see them.
We would like to manage our domain records with Cloudflare since they offer better functionality compared to regular TLDR. However, before we can proceed, we need to inform our current domain provider that we will be using Cloudflare to manage the domain. This is necessary so that they can verify that we are authorized to make changes to the domain while it is still under their control. We can migrate domains between TLDRs, and move it even to Cloudflare directly but we won't be doing that as it takes time and effort. We will only tell current TLDR to check Cloudflare NS records in case any request is received for anything ending up with *.yourdomain.com by your TLDR where you bought the domain initially. This is why we have to put Cloudflare NS "Name Servers" records in current domain provider database so TLDR knows where to look for details about our domain and IPs you will configure in Cloudflare. Each domain provider will have its own way of setting up custom NS records, but all of them will have this option somewhere in the menu.
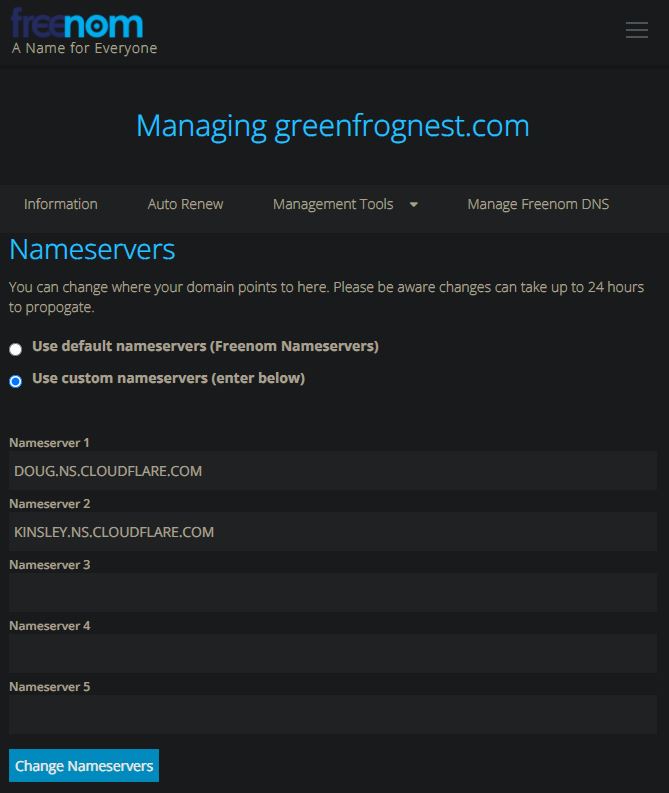
In my case, while I was using FreeNom TLDR, this option was under [Management Tools] -> [Nameservers], while going there, I was able to choose [custom nameservers] and paste a Cloudflare NS records in these dedicated fields. Bear in mind that this change can take some time to propagate, so when you set that once - just wait, do not revert or change anything when applied, be patient, and leave it all for the next day. Also, your NS from Cloudflare might be different than mine.
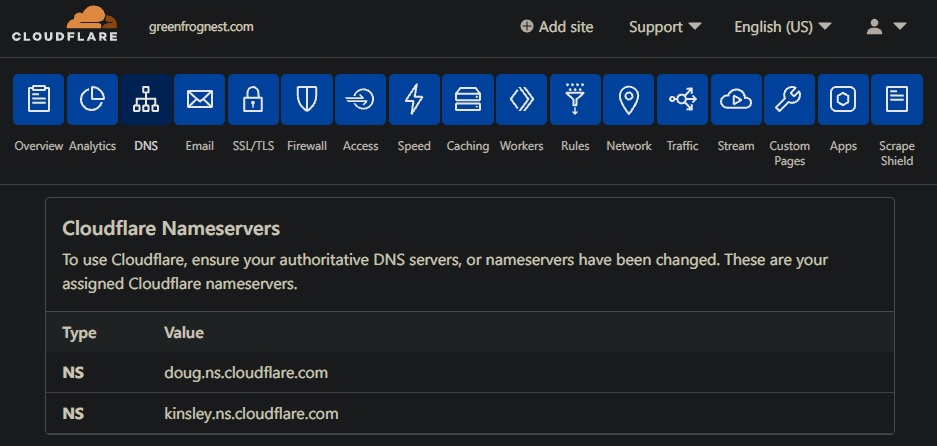
When you [Add Site] in Cloudflare you will be given Name Servers specific to your "Site", each Site added might have differed NS that needs to be given to TLDR that you purchased the domain name from. You can add multiple sites to Cloudflare from as many TLDRs as you want.
After you have your domain/site added to Cloudflare and NS record updated at your TLDR, it is time to create an "A Record" and point it to the IP address - IP where the Docker server is. I assume it will be your external home IP, the WAN IP given to you by your ISP.
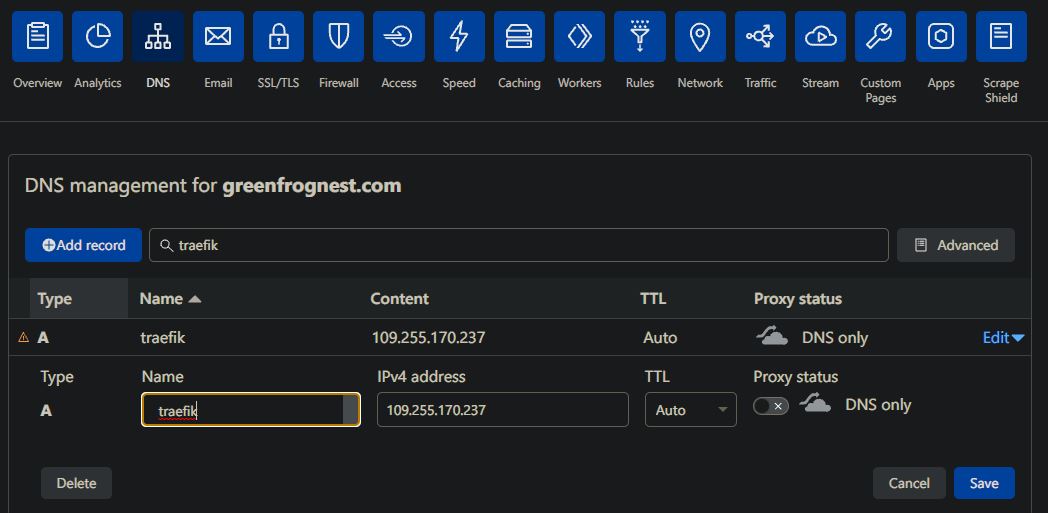
Do not enable Proxy at this point, use "DNS only" as set by default while creating "A Record". Cloudflare will show you warning that IP address of your host will be exposed - this is ok. Test all without proxy, when all works then enable Proxied traffick on the tested record.
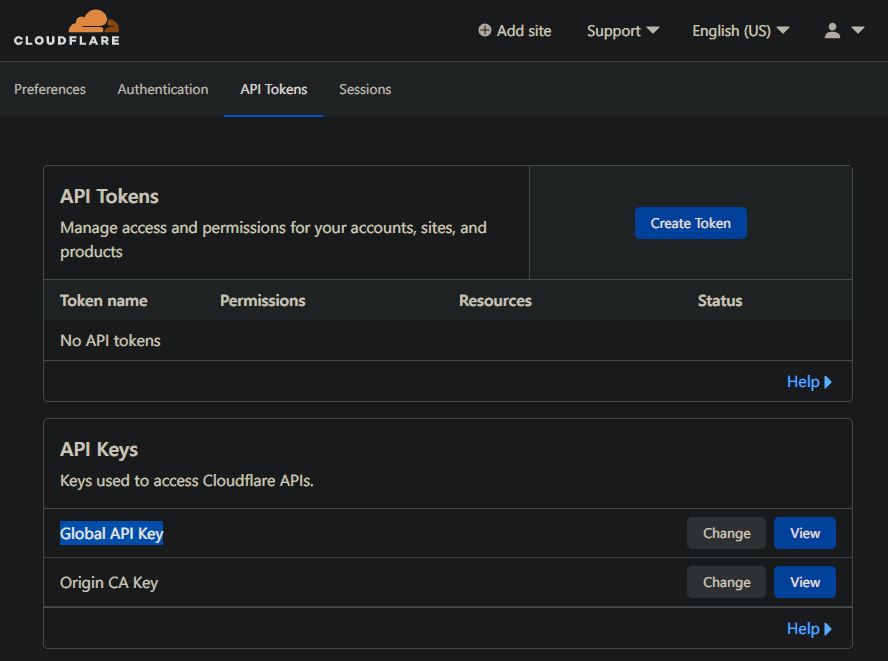
Now let's find values of CF_API_EMAIL and CF_API_KEY. Value of CF_API_EMAIL you know, it is an email address that you used to register with Cloudflare, you can also find it under your profile - if you are not sure. CF_API_KEY can be found under your [Profile] / [API Tokens] / [Global API Key]
Having these two values and an "A Record" created, you are ready to configure Traefik using dnsChallenge for the domain verification.
How to configure Traefik 2? (dnsChallenge)
Below is what you would see if you deploy Traefik container using LMDS deployment script - quick and easy option. You can also copy/paste entire Traefik declaration to any docker-compose file you develop and continue with the article.
My goal was to include as many and as little in this Traefik container declaration. Obviously you will have to adjust certain values to reflect your particular situation.
Cloudflare dnsChallenge on Traefik
Please pay close attention to the following instructions when working with the container declaration below. In the comments section of each line, you will notice different symbols that represent different instructions. Some lines may require you to modify the value to suit your specific use case, while others are fixed. It is important to carefully review these symbols as they will indicate which values need to be changed and which can be kept as is.
! = Important - something to watch up for.
^ = Mandatory to the config - not always mandatory according to traefik documentation.
* = Specific to your config - you have to change it and adopt to your situation.
? = Optional - us if you like.
Please note that the following text is intended to help you configure the Traefik container only. By default, no containers other than Traefik will be exposed, and nothing else will be accessible on the internet. In order to help you understand each line, I have provided detailed comments throughout the configuration.
  traefik:
    container_name: traefik      # ^ Container name
    image: traefik:latest        # ^ Pull latest image
    ports:                       # ! Remember to open below ports on your router and forward them to the server where Traefik is running - otherwise requests from the Internet will be blocked by your router/firewall and nothing will reach Traefik.
      - 80:80                    # ^ Port exposed by Traefik container - related to aliases defined below under "command:" section
      - 443:443                  # ^ Port exposed by Traefik container - related to aliases defined below under "command:" section
      - 8080:8080                # ^ Port exposed by Traefik container - related to aliases defined below under "command:" section
    volumes:
      - /var/run/docker.sock:/var/run/docker.sock       # ^ Docker volume allowing Traefik to access Docker engine - this way Traefik knows what containers are running and what are their network settings.
      - /root/DockerConfig/traefik/acme:/acme           # ^ Docker volume for Traefik to store TLS certificate
      - /root/DockerConfig/traefik/logs:/logs           # ? Docker volume for Traefik to store logs
    #      - ./traefik.yml:/traefik.yml:ro              # ? Traefik file provider definitions
    #      - ./config.yml:/config.yml:ro                # ? External Traefik config file

    environment:        # ^ Environment variables below are specific to CloudFlare
                        # as they are my DNS provider which is also defined few lines below
                        # (--certificatesResolvers.letsencrypt.acme.dnsChallenge.provider=cloudflare")
                        # Just because I use Cloudflare, variables below are what they are
                        # and I took them from here: (https://doc.traefik.io/traefik/https/acme/#providers).
                        # Find your DNS provider there and check what variables you should use instead.
      - [email protected]                   # *
      - CF_API_KEY=482551228411726548CB1F8B0A1443C9         # *

    command:
                     # Globals
      - --api=true      # ^ Enabling Traefik API - In production API, Access should be secured
                        # by authentication and authorizations if exposed outside the network
                        # (https://doc.traefik.io/traefik/operations/api/#configuration)
      - --global.checkNewVersion=true               # ? Periodically check for update - (Default: true)
      - --log.level=DEBUG                           # ? Log level - (Default: ERROR) other logging levels are DEBUG, PANIC, FATAL, ERROR, WARN, and INFO.
      - --log.filePath=/logs/traefik.log            # ? Log path - optional - related to volume /logs defined above
      - --accessLog.filePath=/logs/access.log       # ? Log path - optional - related to volume /logs defined above
      - --accessLog.bufferingSize=100               # ? Log size - optional

                                                # Docker
      - --providers.docker=true                     # ^ Enable Docker provider - other providers (https://doc.traefik.io/traefik/providers/overview)
      - --providers.docker.exposedbydefault=false   # ^ Expose only containers that have labels setup (https://doc.traefik.io/traefik/providers/docker/#exposedbydefault)
      - --providers.docker.endpoint=unix:///var/run/docker.sock # ^ Traefik requires access to the Docker socket in order to get its dynamic configuration from there - related to volume defined above

                                                # Entrypoints
      - --entryPoints.console.address=:8080         # ^ Defining port 8080 as "alias" called "console" - this port will be reachable from outside of Traefik container
      - --entryPoints.web.address=:80               # ^ Defining port 80 as "alias" called "web" - this port will be reachable from outside of Traefik container
      - --entrypoints.websecure.address=:443        # ^ Defining port 443 as "alias" called "websecure" - this port will be reachable from outside of Traefik container

                                                # Redirection to SSL
      - --entryPoints.web.http.redirections.entryPoint.to=websecure     # ^ If trying to access service using port 80 redirect to 443
      - --entryPoints.web.http.redirections.entryPoint.scheme=https     # ^ If trying to access service using http redirect to https
      - --entryPoints.web.http.redirections.entrypoint.permanent=true   # ^ Apply a permanent redirection.

                                                # LetsEncrypt (https://doc.traefik.io/traefik/user-guides/docker-compose/acme-tls/)
      - --certificatesResolvers.letsencrypt.acme.email=your.email@gmail.com     # * Put your email address instead - the same as above in "CF_API_EMAIL"
      - --certificatesResolvers.letsencrypt.acme.storage=acme/acme.json         # ^ Storage location where ACME certificates are going to be saved, this work with conjunction to volume definer above.
      - --certificatesresolvers.letsencrypt.acme.caserver=https://acme-staging-v02.api.letsencrypt.org/directory     # ! Let's Encrypt Staging Server, comment out after testing - (https://doc.traefik.io/traefik/https/acme/#caserver) - highly recommend that you config works ok in staging before using Let's Encrypt live servers. In case of failures in this config you might be banned by Let's Encrypt for a while for abusing their live servers with faulty configuration requests.
      - --certificatesResolvers.letsencrypt.acme.dnsChallenge=true # * DNS challenge, there are other ways of proving that you owned domain name defined below (https://doc.traefik.io/traefik/https/acme/#dnschallenge)
      - --certificatesResolvers.letsencrypt.acme.dnsChallenge.provider=cloudflare   # * Find your provider (https://doc.traefik.io/traefik/https/acme/#providers) and replace cloudflare with the one you use. This corresponds to "environment:" variables defined earlier.
     #- --providers.file=true      # ? Enable file provider if you need it.

    labels:                     # Labels - finally section where you define if container should be exposed, under what domain name, IP, path etc. You will be creating labels for each container that you want Traefik to route packets to from the Internet.
      - traefik.enable=true     # ^ Enabling Traefik container to be exposed by itself
      - traefik.http.middlewares.admin.basicauth.users=admin:{SHA}/jIOs1SoLMVGd6FMOlt5mF6Ega0=  # * Generate SHA1 to protect access to the Web UI here: https://hostingcanada.org/htpasswd-generator - on this page I used: user/password = admin/greenfrog and got htpasswd: admin:{SHA}/jIOs1SoLMVGd6FMOlt5mF6Ega0=  (https://doc.traefik.io/traefik/middlewares/basicauth/). You can reuse this line multiple times under different containers to protect access to them.

                                                                                # Define route/router called "thisproxylocal"
      - traefik.http.routers.thisproxylocal.rule=Host(`xxx.xxx.xxx.xxx`)            # * Change xxx.xxx.xxx.xxx to your Docker server IP
      - traefik.http.routers.thisproxylocal.entryPoints=console                     # ^ Traefik WebUI is by default exposed on port 8080 so we have to redirect all requests to that port by creating entryPoint equal to "console" - alias that we defined several lines above.
      - traefik.http.routers.thisproxylocal.service=api@internal                    # ^ Enable WebUI service on this specific router.
      - traefik.http.routers.thisproxylocal.middlewares=admin                       # ^ Enabling authentication on this specific router.

                                                                                # Define route/router called "thisproxytls"
      - traefik.http.services.thisproxytls.loadbalancer.server.port=8080            # ^ Define loadBalancer port for WebUI
      - traefik.http.routers.thisproxytls.rule=Host(`your.domain.com`)              # * Define URL that will be redirected to this container on port 8080 from https
      - traefik.http.routers.thisproxytls.entrypoints=websecure                     # ^ Just because we defined redirection where any request from the Internet received on port 80 - http will be redirected to port 443 https we open websecure entrypoint as this is from where we will be receiving all the traffick anyway.
      - traefik.http.routers.thisproxytls.service=api@internal                      # ^ Enable WebUI service on this specific router.
      - traefik.http.routers.thisproxytls.middlewares=admin                         # ^ Enabling authentication on this specific router.
      - traefik.http.routers.thisproxytls.tls.certresolver=letsencrypt              # ^ Use Let's Encrypt resolver for TLS certification

    restart: always
At this point you should be able to access Traefik dashboard using below links, browser will prompt you for user/password = admin/greenfrog:
http://Your-IP:8080 (from your LAN)
https://your.domain.com:8080 (from the Internet - use your phone)
How to proxy containers through Traefik?
So far we only configured the Traefik container and nothing else. Even if you have other container declarations in your docker-compose file, none of them are going to be exposed by Traefik therefore access to them is not possible through the Traefik proxy yet. Let's fix that.
For containers to be seen by Traefik and be accessible from the Internet and on LAN, we need to create for each container so-called "labels" and an "A Record" in Cloudflare.
First, let's create labels for Traefik to become aware of the other containers. Each container will have its own set of labels. This is not going to be any different from the example shown above in the basic setup for tlschallenge.
Lets take as an example Sonarr container:
  sonarr:
    image: linuxserver/sonarr
    container_name: sonarr
    environment:
      - PUID=1000
      - PGID=1000
      - TZ=UTC
      - UMASK_SET=022 #optional
    volumes:
      - ./volumes/sonarr/data:/config
      - ./media/tvshows:/tv
      - ./downloads:/downloads
    ports:
      - 8989:8989
    restart: unless-stopped
We will modify the above code to enable Traefik to proxy this container. The container declaration should be in the same docker-compose file as the Traefik declaration.
  sonarr:
    image: linuxserver/sonarr
    container_name: sonarr
    environment:
      - PUID=1000
      - PGID=1000
      - TZ=UTC
      - UMASK_SET=022 #optional
    volumes:
      - ./volumes/sonarr/data:/config
      - ./media/tvshows:/tv
      - ./downloads:/downloads
    labels:
      - traefik.enable=true
      - traefik.http.routers.sonarr.rule=Host(`your.domain.com`) || Path(`/sonarr`) # replace your.domain.com
      - traefik.http.routers.sonarr.entrypoints=websecure
      - traefik.http.routers.sonarr.tls.certresolver=letsencrypt
    restart: unless-stopped
After saving changes run docker-compose up -d --remove-orphans, now your container should be accessible from the Internet and local network:
https://your.domain.comLAN-IP/sonarr
If you want to tunnel another container through Traefik, just copy/paste labels: section and replace XXX with something different that resemble your situation.
    labels:
      - traefik.enable=true
      - traefik.http.routers.XXX.rule=Host(`XXX.XXX.com`) || Path(`/XXX) # replace your.domain.com
      - traefik.http.routers.XXX.entrypoints=websecure
      - traefik.http.routers.XXX.tls.certresolver=letsencrypt
    restart: unless-stopped
I really hope you are successful in deploying Traefik on LMDS and poxing other containers through it.
Please consider supporting LMDS by using affiliate links or donating to the project using the link at the top of the page.

Help me make LMDS better
With your support anything is possible
- Beginner
- Objectives
- Concept
- Hardware
- Hypervisor
- Hypervisor Manager
- Hypervisor Initial Config to be continued...
- Advanced
- My Quiet Lab
- Active
- Depreciated

Build your own Audiobook streaming system
Article will show you how to build Audible like streaming system based on Booksonic - audiobook streaming server and Subsonic phone app that let you listen audiobooks online anywhere you are.
Go to article