Banana Pi BPI-M1+ (SATA) OMV NAS and LDS
Posted on May 21, 2018 at 20:55 by GreenFrog
OpenMediaVault NAS + Sonarr, Raddar, Jackett, Deluge and Headphones
What is all that? you may ask.
Well, while having fully automated Linux Download System on Raspberry Pi is great for searching and downloading all your favorite TV shows and other media, I decided to deploy LDS on top of the Openmediavault NAS. Doing so, it gives me one device that do the downloads and in the same time share all resources over the network with TV, laptop and whatnot. Entire setup is cost officiant (TCO), quiet and easy to manage due to WebUI for all the services.
Openmediavault software is also available for Raspberry Pi and many other SBC's but I decided to go with Banana Pi BPI-M1+. This SBC board offers a SATA port that can be used to connect standard 2.5 inch drive powered directly from Banana Pi or 3,5 inch disk powered by external power supplier.
This particular Banana Pi is not the fastest one but does the job and I only have this one to play with,
there are more advanced boards available - but well - you do best with what you have.
 Please back up your current OMV SD card before proceeding with the script.
The best way is to start fresh with brand new OMV image using spare SD card.
After script deployment is done and you are happy with what you have mount your hard drive back to the new system.
I tested my script as best as I could but still - it can always go south when you list expecting, taking your precious data with it.
Please back up your current OMV SD card before proceeding with the script.
The best way is to start fresh with brand new OMV image using spare SD card.
After script deployment is done and you are happy with what you have mount your hard drive back to the new system.
I tested my script as best as I could but still - it can always go south when you list expecting, taking your precious data with it.
-
Openmediavault image - look under
Other armhf imagesand downloadOMV_3_0_87_Bananapi_4.12.9.img.xzUnfortunatelly as from 30.06.2018 openmediavault 3.x is EOL - I hope we will have version 4.x also available for older SBC's like mine in the future. - Banana Pi BPI-M1+ Dual-core 1.0GHz CPU with 1 GB DDR3 memory on board.
- SATA drive for storage and shares.
-
SD card (any will do, just make sure you have 2GB of storage in
/dev/mmcblk0p2partition for OMV and all the plugins. By default, when OMV is put into SD card system only partitioning small part of it. Use Class 10 card - do not use slow card as script might run for very long time or might not even finish at all.
When you boot your OMV for the first time leave it running for about 5 minutes - system will most likely reboot during that time. After OMV has rebooted, login to WebUI and enable SSH access. During the time while script is running do not use OMV WebUI or do any changes in the background to the system settings/services.
It happened to me, freshly booted system does some self-maintenance that interfere with the script in a form of locking
dpkg database preventing script from obtaining code>/var/lib/dpkg/lock.
Just make sure that system is idle for a while before starting the script.
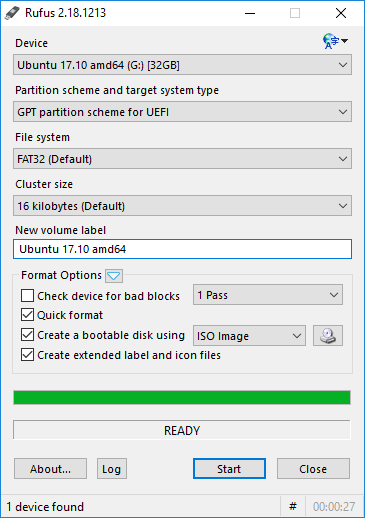
 Image your SD card
- Download Rufus.
- Insert your microSD card into card reader and find out its drive letter in Windows Explorer.
- Run Rufus and select Drive that contain your SD card (for example G:).
- Select the OMV image file you downloaded clicking on small CD drive icon in Rufus software. If Rufus do not see your *.img file, change file type to see all as by default Rufus only recognizes *.iso files and your OMV image is an *.img type file.
- Select [Start] and wait for the process to finish.
- Now you can plug SD card into your Banana Pi’s slot, connect network cable and power it ON.
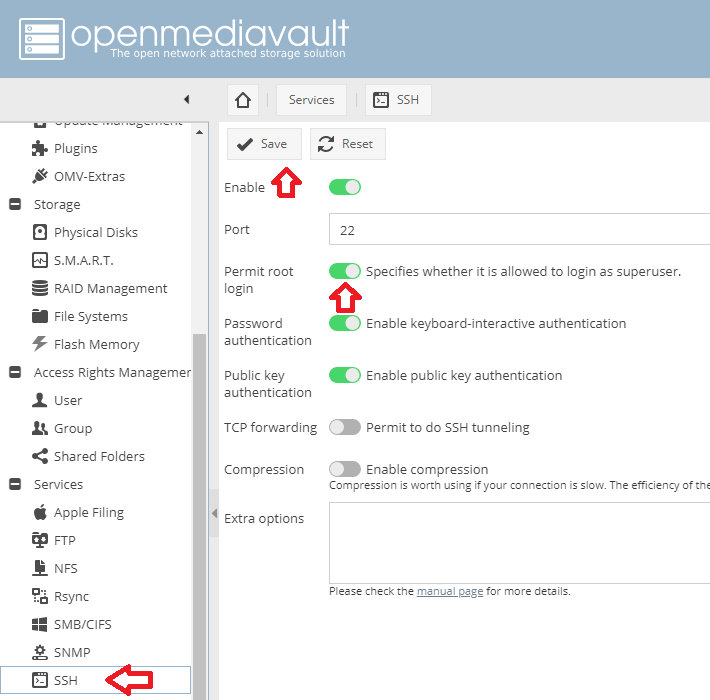
 Enable SSH Access
Openmediavault image I used required me to enable SSH from the WebUI first, before I could connect in to it via PuTTY over SSH.
WebUI:
User: admin
Password: openmediavault
SSH Console:
User: root
Password: openmediavault
Using your browser login to OMV WebUI with credentials from above. Navigate to [Services] - [SSH] - [Permit root login] - [Save] and [Apply] changes. Log out from WebUI and connect using PuTTY.
 Expand /dev/mmcblk0p2 (*optional step)
In case your SD card is smaller than 8GB, you might end up with /dev/mmcblk0p2 partition that is less than essential 2GB for running the script. If that is the case, you will have to expand /dev/mmcblk0p2 partition, potentially allocating entire remaining free space on the card in to it. You can, of course expand to the size you desire - below I took all remaining space on the SD card - it is just easy that way.
Connect to your system using PuTTY.
Navigate to [Storage] - [Physical Disks] and check how much space is allocated for /dev/mmcblk0p2 partition - in my case system allocated 863MB out from 8GB SD card.

Be careful - you might destroy your system.
But since you are here I expect you know what you are doing.
In worst case scenario system won't boot and you will start fresh
Short listening of commands:
root@bananapi:~# df
root@bananapi:~# fdisk /dev/mmcblk0

Command (m for help): p
Command (m for help): d
Partition number (1,2, default 2): 2
Command (m for help): n
Enter
Enter
Command (m for help): w

root@bananapi:~# systemctl enable resize2fs
root@bananapi:~#reboot
Entire commands output:
root@bananapi:~# df
Filesystem     1K-blocks   Used Available Use% Mounted on
udev               10240      0     10240   0% /dev
tmpfs             204720   5832    198888   3% /run
/dev/mmcblk0p2    883712 579168    230144  72% /
tmpfs             511800      0    511800   0% /dev/shm
tmpfs               5120      8      5112   1% /run/lock
tmpfs             511800      0    511800   0% /sys/fs/cgroup
tmpfs             511800     40    511760   1% /tmp
/dev/mmcblk0p1     59365  24660     32085  44% /boot
tmpfs             102360      0    102360   0% /run/user/0

root@bananapi:~# fdisk /dev/mmcblk0

Welcome to fdisk (util-linux 2.25.2).
Changes will remain in memory only, until you decide to write them.
Be careful before using the write command.


Command (m for help): p
Disk /dev/mmcblk0: 7.3 GiB, 7822376960 bytes, 15278080 sectors
Units: sectors of 1 * 512 = 512 bytes
Sector size (logical/physical): 512 bytes / 512 bytes
I/O size (minimum/optimal): 512 bytes / 512 bytes
Disklabel type: dos
Disk identifier: 0xfe2520d8

Device         Boot  Start     End Sectors  Size Id Type
/dev/mmcblk0p1        2048  133119  131072   64M 83 Linux
/dev/mmcblk0p2      133120 1900543 1767424  863M 83 Linux

Command (m for help): d
Partition number (1,2, default 2): 2

Partition 2 has been deleted.

Command (m for help): n
Partition type
   p   primary (1 primary, 0 extended, 3 free)
   e   extended (container for logical partitions)
Select (default p): p
Partition number (2-4, default 2): 2
First sector (133120-15278079, default 133120):
Last sector, +sectors or +size{K,M,G,T,P} (133120-15278079, default 15278079):

Created a new partition 2 of type 'Linux' and of size 7.2 GiB.

Command (m for help): p
Disk /dev/mmcblk0: 7.3 GiB, 7822376960 bytes, 15278080 sectors
Units: sectors of 1 * 512 = 512 bytes
Sector size (logical/physical): 512 bytes / 512 bytes
I/O size (minimum/optimal): 512 bytes / 512 bytes
Disklabel type: dos
Disk identifier: 0xfe2520d8

Device         Boot  Start      End  Sectors  Size Id Type
/dev/mmcblk0p1        2048   133119   131072   64M 83 Linux
/dev/mmcblk0p2      133120 15278079 15144960  7.2G 83 Linux

Command (m for help): w
The partition table has been altered.
Calling ioctl() to re-read partition table.
Re-reading the partition table failed.: Device or resource busy

The kernel still uses the old table. The new table will be used at the next reboot or after you run partprobe(8) or kpartx(8).

root@bananapi:~# systemctl enable resize2fs
Synchronizing state for resize2fs.service with sysvinit using update-rc.d...
Executing /usr/sbin/update-rc.d resize2fs defaults
insserv: warning: current start runlevel(s) (empty) of script `resize2fs' overrides LSB defaults (2 3 4 5).
insserv: warning: current stop runlevel(s) (0 1 2 3 4 5 6) of script `resize2fs' overrides LSB defaults (0 1 6).
Executing /usr/sbin/update-rc.d resize2fs enable

root@bananapi:~#reboot
Result should look something like below - in my case /dev/mmcblk0p2 partition is now 7.22GB in size.

 Deploy Script
Copy and paste below into your PuTTY session, then press Enter.
wget https://www.dropbox.com/s/v9hz772tv4jyvbd/omv-lds-deploy.sh --no-check-certificate
Change file permissions.
chmod 755 omv-lds-deploy.sh
Execute script
./omv-lds-deploy.sh
When script is done you should see something like below.

Copy links from the script summary and save them somewhere, in case you won't remember all the port numbers.
Test each link one by one to see if all is available - Deluge default password is deluge.
 Configure Network Share
Objective is to mount HDD into OMV, create file system on it and create share available to any system in the network.
-
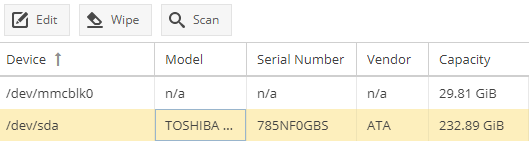
Check if OMV see your HDD - Using your browser login to OMV WebUI and navigate to [Storage] - [Physical Disks] - check if you see drive that you connected to the Banana Pi - it has to be there to continue.
-
Create File System - Navigate to [Storage] - [File Systems] - [+Create] - select (Device), give it a (Label), leave EXT4 (File System) - [OK]
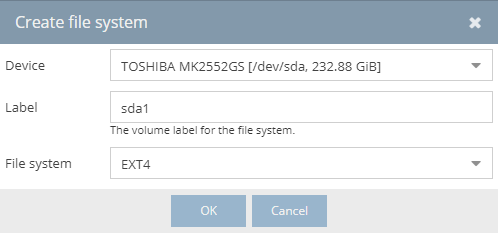
Confirm warning message [Yes]
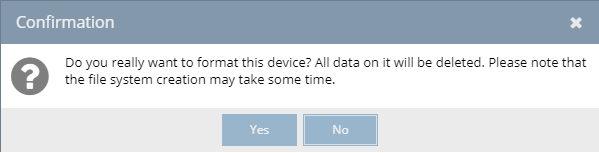
Wait Until process is completed [Close]
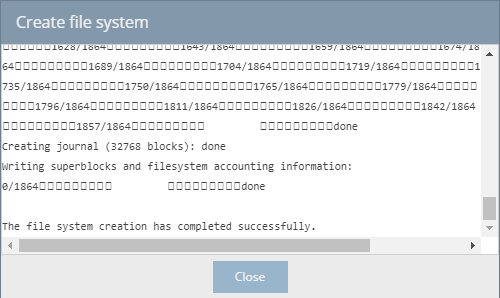
New File System has been created

-
Mount File System - Navigate to [Storage] - [File Systems] - (select file system you created) - [>Mount] After short while view should change to something like below and Mount button will become inactive.

-
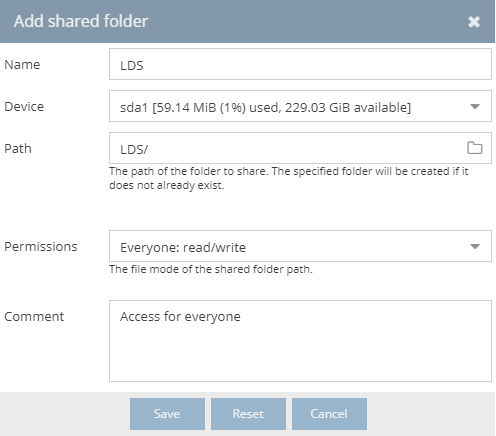
Create Network Share Navigate to [Access Rights Management] - [Shared Folders] - [+Add] - give it a (Name), select (File System), select (Path) select (Permissions Everyone: read/write) - [Save] and [Apply]
-
Enable SMB/CIFS Navigate to [Services] - [SBM/CIFS] - [Enable] - [Save] and [Apply]

-
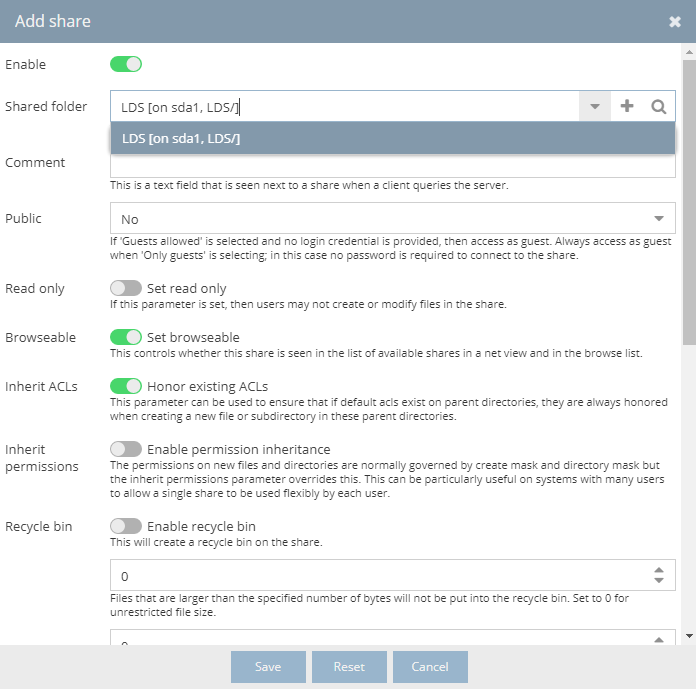
Activate Shares Navigate to [Services] - [SBM/CIFS] - second tab [Shares] - [+Add] select (Shared folder LDS [on sda1, LDS/) - [Save] and [Apply]
-
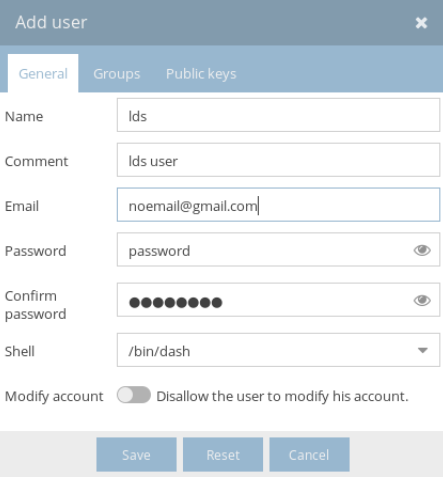
Create lds User Navigate to [Access Rights Management] - [User] - [+Add] - complete General section and [Save] and [Apply]
-
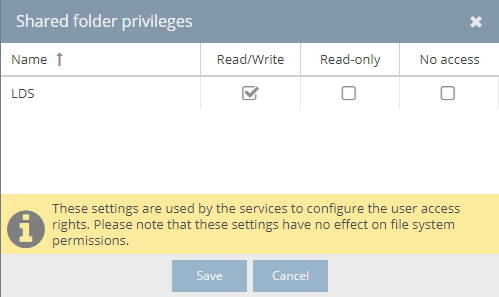
Change lds User Privileges Navigate to [Access Rights Management] - [User] - [Privileges] - select LDS share and [Save] and [Apply]
- Your share folder should be accessible over the network from any PC

Help me make LMDS better
With your support anything is possible
- Beginner
- Objectives
- Concept
- Hardware
- Hypervisor
- Hypervisor Manager
- Hypervisor Initial Config to be continued...
- Advanced
- My Quiet Lab
- Active
- Depreciated
Build your own Audiobook streaming system
Article will show you how to build Audible like streaming system based on Booksonic - audiobook streaming server and Subsonic phone app that let you listen audiobooks online anywhere you are.
Go to article