DNS - Domain Name System
Posted on September 10, 2017 at 13:47 by GreenFrog
 Domain Name System (DNS)
System is based on Ubuntu Server 16.04.2 LTS and Bind9, these two pieces will be responsible for
translating domain names in local network, this way you do not need to modify hosts files in your
local machine to communicate with local hosts using their FQDN. Local DNS will be only responsible
for local domain names so all the other requests will be forwarded to your ISP DNS, this way you can still resolve any
Internet address as before.
I wont be building caching DNS server as this is not needed for my purposes and such server
would require more resources than I can dedicate for this task, i.e. caching DNS server usually require SSD drive for it to make sense.
 Install Ubuntu Server 16.04.2 LTS
Download Ubuntu Server ISO file and save somewhere so you know where it is.
Below HOWTO document is based on Ubuntu Server 16.04.2 LTS so if you would like to follow along get the same version, of course it will work more or less the same way on any other Ubuntu version.
Info There is one decision to make before deploying anything. You can deploy Ubuntu Server as standalone server on bear metal - desktop/laptop etc. or you might consider having it installed as virtual machine using i.e. Virtual Box or VMware Workstation.
I would encourage you to use any virtualization platform for many reasons. By having server as a VM you will be able to snapshot your system at any time and go back to that snapshot if something will go wrong, you can also migrate your system to other server hardware if needed in the future and not having to go thought all of the configuration again.
I personally use NAS server that offer its own virtualization platform. I use separate hardware mainly because my QNAP NAS is always ON and is hidden from site.
I won’t be telling you how to deploy Linux OS - just install it somewhere, depending on how that installation is done you might not need SSH.
 Enable SSH Access
Just because my system is remote I need to install SSH service on it so I can manage Ubuntu remotely.
Install SSH server:
sudo apt-get install openssh-serverAfter installation is completed we should be able to connect to the server via PuTTY
I am not going to change any of the default settings for SSH access but if you what to be more secure go ahead and check documentation on - Ubuntu official support page
 Install Bind9 DNS Server
While connected to the server via SSH, enter the following command to install dns server:
sudo apt install bind9A very useful package for testing and troubleshooting DNS issues is the dnsutils package. Very often these tools will be installed already, but to check and/or install dnsutils enter the following:
sudo apt install dnsutils Configure Bind9
In this section BIND9 will be configured as the Primary Master for the domain lab.org.
Simply replace lab.org with your FQDN (Fully Qualified Domain Name) if you wish to have specific one.
Forward and Reverse Zone File
To add a DNS zone to BIND9, turning BIND9 into a Primary Master server, the first step is to edit /etc/bind/named.conf.local:
sudo nano /etc/bind/named.conf.local Paste below or adjust as you require then save the file. You need to remember that below needs to work with conjunction to your subnet IP addressing set on your router. In my case network IP is 192.168.100.0/24 - yours might be different - adjust below accordingly
zone "lab.org" {
        type master;
        file "/etc/bind/db.lab.org";
};
zone "100.168.192.in-addr.arpa" {
        type master;
        file "/etc/bind/db.192";
};
Now use an existing zone file as a template to create the /etc/bind/db.lab.org file:
sudo cp /etc/bind/db.local /etc/bind/db.lab.org
sudo nano /etc/bind/db.lab.org
You must increment the Serial Number every time you make changes to the zone file you just created.
If you make multiple changes before restarting BIND9, simply increment the Serial once.
;
; BIND data file for local loopback interface
;
$TTL    604800
@       IN      SOA     lab.org. root.lab.org. (
                             10         ; Serial
                         604800         ; Refresh
                          86400         ; Retry
                        2419200         ; Expire
                         604800 )       ; Negative Cache TTL
                IN      A       192.168.100.47
wan             IN      A       192.168.100.1
ilo             IN      A       192.168.100.49
esx             IN      A       192.168.100.50
vcenter         IN      A       192.168.100.51
esx1            IN      A       192.168.100.61
esx2            IN      A       192.168.100.62
esx3            IN      A       192.168.100.63
esx4            IN      A       192.168.100.64
qnap            IN      A       192.168.100.100
dc1             IN      A       192.168.100.90
dc2             IN      A       192.168.100.91
sql1            IN      A       192.168.100.92
sql2            IN      A       192.168.100.93
client1         IN      A       192.168.100.94
client2         IN      A       192.168.100.95
dsm1            IN      A       192.168.100.96
dsm2            IN      A       192.168.100.97
vasa1           IN      A       192.168.100.98

www             IN      CNAME   esx
;
@       IN      NS      ns.lab.org.
@       IN      A       192.168.100.47
@       IN      AAAA    ::1
ns      IN      A       192.168.100.47
Restart Bind
sudo systemctl restart bind9.service
Create /etc/bind/db.192 file and edit it to create aka. PTR records for each host, it is called reverse lookup zone where you getting name of the host while querying IP.
sudo cp /etc/bind/db.127 /etc/bind/db.192
sudo nano /etc/bind/db.192
$TTL    604800
@       IN      SOA     ns.lab.org. root.lab.org. (
                              5         ; Serial
                         604800         ; Refresh
                          86400         ; Retry
                        2419200         ; Expire
                         604800 )       ; Negative Cache TTL
;
@       IN      NS      ns.
47      IN      PTR     ns.lab.org.
49      IN      PTR     ilo.lab.org.
50      IN      PTR     esx.lab.org.
51      IN      PTR     vcenter.lab.org.
61      IN      PTR     esx1.lab.org.
62      IN      PTR     esx2.lab.org.
63      IN      PTR     esx3.lab.org.
64      IN      PTR     esx4.lab.org.
90	IN	PTR	dc1.lab.org.
91	IN	PTR	dc2.lab.org.
92	IN	PTR	sql1.lab.org.
93	IN	PTR	sql2.lab.org.
94	IN	PTR	client1.lab.org.
95	IN	PTR	client2.lab.org.
96	IN	PTR	dsm1.lab.org.
97	IN	PTR	dsm2.lab.org.
98	IN	PTR	vasa1.lab.org.
99	IN	PTR	empty.lab.org.
100      IN      PTR     qnap.lab.org.
Restart Bind DNS server
sudo systemctl restart bind9.service  Configure Router
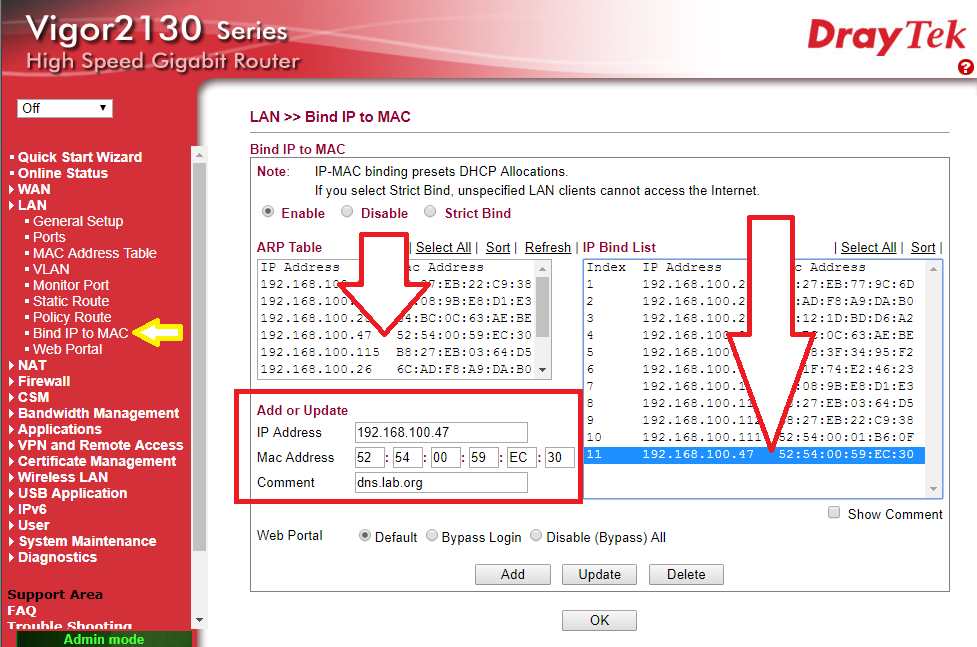
Now while DNS system is created we need to configure our router to make our entire network to use it. First we have to bind an IP to a MAC of the server we use for DNS - this way that MAC will always get the same IP from DHCP running on the router. If you do not have such option on your router just set a static IP on the DNS server you created.
Binding DNS Server MAC address to a specific IP address - in my case I need 52:54:00:59:EC:30 MAC to be always getting IP of 192.168.100.47.
Below is a screen from my home router where I bind MAC to IP.
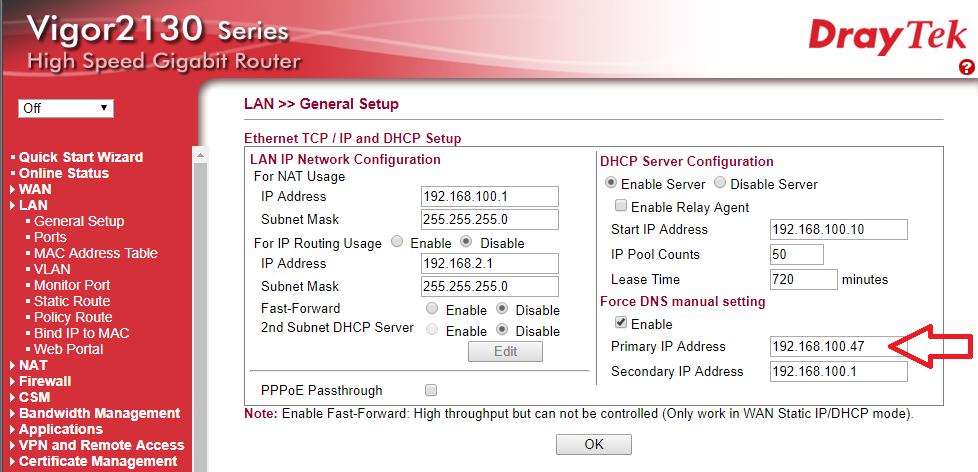
Now I need to set my primary DNS to be the server I created, this will instruct all computers in the network to use it while resolving domain names.
Below is a screen from my home router where I set Primary DNS IP to be 192.168.100.47
 Testing DNS
Make sure that your DNS Server has already an IP that you set up on the router, in my case it is 192.168.100.47,
if not just reboot the server and check it again.
maniuch@dns:~$ ifconfig -v
ens3      Link encap:Ethernet  HWaddr 52:54:00:59:ec:30
          inet addr:192.168.100.47  Bcast:192.168.100.255  Mask:255.255.255.0
          inet6 addr: fe80::5054:ff:fe59:ec30/64 Scope:Link
          UP BROADCAST RUNNING MULTICAST  MTU:1500  Metric:1
          RX packets:530 errors:0 dropped:0 overruns:0 frame:0
          TX packets:580 errors:0 dropped:0 overruns:0 carrier:0
          collisions:0 txqueuelen:1000
          RX bytes:130734 (130.7 KB)  TX bytes:56664 (56.6 KB)
Now, on your local computer check if your network settings have your DNS IP address adjusted already, if not just run ipconfig /renew,
that on Windows should refresh network settings from your DHCP running on your router.
In my case network settings look as below:
C:\>ipconfig /all

Windows IP Configuration

   Host Name . . . . . . . . . . . . : DESKTOP
   Primary Dns Suffix  . . . . . . . :
   Node Type . . . . . . . . . . . . : Hybrid
   IP Routing Enabled. . . . . . . . : No
   WINS Proxy Enabled. . . . . . . . : No
   DNS Suffix Search List. . . . . . : lan

Ethernet adapter Ethernet:

   Connection-specific DNS Suffix  . : lan
   Description . . . . . . . . . . . : Intel(R) 82567LM-3 Gigabit Network Connection
   Physical Address. . . . . . . . . : 00-AA-AA-12-00-AA
   DHCP Enabled. . . . . . . . . . . : Yes
   Autoconfiguration Enabled . . . . : Yes
   Link-local IPv6 Address . . . . . : fe80::56ad:9aff:a367:9bc0%18(Preferred)
   IPv4 Address. . . . . . . . . . . : 192.168.100.11(Preferred)
   Subnet Mask . . . . . . . . . . . : 255.255.255.0
   Lease Obtained. . . . . . . . . . : 10 September 2017 10:26:50
   Lease Expires . . . . . . . . . . : 11 September 2017 00:39:13
   Default Gateway . . . . . . . . . : 192.168.100.1
   DHCP Server . . . . . . . . . . . : 192.168.100.1
   DHCPv6 IAID . . . . . . . . . . . : 83891572
   DHCPv6 Client DUID. . . . . . . . : 00-06-AA-01-21-FF-72-83-00-AA-AA-12-00-AA
   DNS Servers . . . . . . . . . . . : 192.168.100.47
                                       192.168.100.1
   NetBIOS over Tcpip. . . . . . . . : Enabled
Now I can test if I can ping any host that I created record in DNS if my local PC know what the IP address it should ping and if is responding.
I created a record for my router and called it wan.lab.org, now I should be able to ping it by name not by IP.
C:\>ping wan.lab.org

Pinging wan.lab.org [192.168.100.1] with 32 bytes of data:
Reply from 192.168.100.1: bytes=32 time=1ms TTL=64
Reply from 192.168.100.1: bytes=32 time=1ms TTL=64
Reply from 192.168.100.1: bytes=32 time=1ms TTL=64
Reply from 192.168.100.1: bytes=32 time=1ms TTL=64
Done DNS is working as expected.
Now I can keep adding records in to forward and reverse lookup zone and always be sure that I can get to any of my hosts by name not by IP.
The only down site to above solution is that your hosts need to have the same IPs given by DHCP server each time they will get to network, otherwise DNS will be pointing you to an IP that is no longer correct. Above is ok if your IP do not change and for lab environment where you keep your servers, they should always do have static IP addresses anyway.

Help me make LMDS better
With your support anything is possible
- Beginner
- Objectives
- Concept
- Hardware
- Hypervisor
- Hypervisor Manager
- Hypervisor Initial Config to be continued...
- Advanced
- My Quiet Lab
- Active
- Depreciated


Build your own Audiobook streaming system
Article will show you how to build Audible like streaming system based on Booksonic - audiobook streaming server and Subsonic phone app that let you listen audiobooks online anywhere you are.
Go to article