Ubuntu LDS - Linux Download Server
Posted on June 22, 2017 at 23:40 by GreenFrog

Ubuntu LDS - Linux Download Server
Linux Download Server (LDS) is an automation system that will keeps track of all your TV Shows, Movies and Music.
System is based on Ubuntu Server 16.04.2 LTS connected to Internet via VPN for security. Server incorporate Deluge as Torrent Client, Sonarr as Content Manager (TV Shows), Radarr Content Manager (Movies), Jackett Torrent Socket and Headphones Content Manager (Music)
 Install Ubuntu Server 16.04.2 LTS
Below article describes deployment process on Ubuntu Server 16.04.2 LTS but it will be more the same on more modern version.
Info There is one decision to make before deploying anything. You can deploy Ubuntu Server as standalone server on bear metal - desktop/laptop etc. or you might consider having it installed as virtual machine using i.e. Virtual Box or VMware Workstation.
I would encourage you to use any virtualization platform for many reasons. By having server as a VM you will be able to snapshot your system at any time and go back to that snapshot if something will go wrong, you can also migrate your system to another server hardware if needed in the future and not having to go thought all of the configuration again.
I personally use QNAP NAS that offer its own virtualization platform. I use it mainly because my QNAP NAS is always ON and is hidden from site where only noise I get is from my laptop and not from array of disks, trust me you will need substantial disk capacity if system that you are about to build will work as it should.
I won’t be telling you how to deploy Linux OS - just install it somewhere, depending on how that installation is done you might not need SSH access or VPN. If you install Ubuntu on a remote hardware you will obviously need some SSH access into it and VPN might be necessary if i.e. Torrent traffic is blocked by your ISP.
 Enable SSH Access
Just because my Ubuntu server is remote I need to install SSH service on it first so I can manage it remotely.
Install SSH server:
sudo apt-get install openssh-serverAfter installation is completed we should be able to connect to the server via PuTTY
 Install and Configure OpenVPN
- OpenVPN Support Page
- Ubuntu OpenVPN Support Page - look for "Simple Client Configuration"
Install OpenVPN client:
sudo apt install openvpn
Now, if you choose a VPN provider (paid or free) they should provide you with *.ovpn file - this file contain connection details that you should use while connecting to the VPN provider servers.
If you decided which VPN server you are going to use, select relevant *.ovpn file provided and copy it to your Ubuntu server - copy it in to your home folder for now.
Change *.ovpn file name to client.conf:
sudo mv current_name.ovpn client.conf
Copy client.conf file in to /etc/openvpn/
sudo cp -r client.conf /etc/openvpn/client.conf
Edit copied file and find section called auth-user-pass and change it to auth-user-pass auth.txt save and exit Ctrl + O and Ctrl + X
sudo nano /etc/openvpn/client.conf
Create auth.txt file:
sudo nano /etc/openvpn/auth.txt
Put your VPN username and password in to auth.txt file, save and exit.
Now we need to make sure that OpenVPN client will start each time server is rebooted.
Edit /etc/default/openvpn file:
sudo nano /etc/default/openvpn
Find section #AUTOSTART="all" and remove "#" then save and exit Ctrl + O and Ctrl + X
Reload OpenVPN daemon:
sudo systemctl daemon-reload
OpenVPN is a templated service under systemd. The service is named [email protected]. So you should be starting your VPN service using file you copied earlier /etc/openvpn/client.conf where .conf file name is incorporated in to service enable and start command as below:
systemctl enable [email protected]
systemctl start [email protected]
systemctl status [email protected]
You should see something like below after typing commands from above:
BTW. my config.conf file is named nordvpn.conf therefore your output will look slightly different.
● [email protected] - OpenVPN connection to nordvpn
     Loaded: loaded (/lib/systemd/system/[email protected]; disabled; vendor preset: enabled)
     Active: active (running) since Sun 2017-07-09 12:39:15 IST; 1min 6s ago
       Docs: man:openvpn(8)
             https://community.openvpn.net/openvpn/wiki/Openvpn23ManPage
             https://community.openvpn.net/openvpn/wiki/HOWTO
    Process: 1765 ExecStart=/usr/sbin/openvpn --daemon ovpn-%i --status /run/openvpn/%i.status 10 --cd /etc/openvpn --script-security 2 --config /etc/openvpn/%i.conf --writepid /run/
   Main PID: 1769 (openvpn)
     CGroup: /system.slice/system-openvpn.slice/[email protected]
             └─1769 /usr/sbin/openvpn --daemon ovpn-nordvpn --status /run/openvpn/nordvpn.status 10 --cd /etc/openvpn --script-security 2 --config /etc/openvpn/nordvpn.conf --writepi

  Jul 09 12:39:18 lds ovpn-nordvpn[1769]: ROUTE_GATEWAY 192.168.88.1/255.255.255.0 IFACE=ens3 HWADDR=00:54:00:01:b6:0f
  Jul 09 12:39:18 lds ovpn-nordvpn[1769]: TUN/TAP device tun0 opened
  Jul 09 12:39:18 lds ovpn-nordvpn[1769]: TUN/TAP TX queue length set to 100
  Jul 09 12:39:18 lds ovpn-nordvpn[1769]: do_ifconfig, tt->ipv6=0, tt->did_ifconfig_ipv6_setup=0
  Jul 09 12:39:18 lds ovpn-nordvpn[1769]: /sbin/ip link set dev tun0 up mtu 1500
  Jul 09 12:39:18 lds ovpn-nordvpn[1769]: /sbin/ip addr add dev tun0 10.56.65.12/24 broadcast 10.56.65.255
  Jul 09 12:39:18 lds ovpn-nordvpn[1769]: /sbin/ip route add 109.202.102.87/32 via 192.168.88.1
  Jul 09 12:39:18 lds ovpn-nordvpn[1769]: /sbin/ip route add 0.0.0.0/1 via 10.56.65.1
  Jul 09 12:39:18 lds ovpn-nordvpn[1769]: /sbin/ip route add 128.0.0.0/1 via 10.56.65.1
  Jul 09 12:39:18 lds ovpn-nordvpn[1769]: Initialization Sequence Completed
Now when typing ifconfig you should see additional network interface named tun0 and IP address that is obtained from your VPN provider.
tun0      Link encap:UNSPEC  HWaddr 00-00-00-00-00-00-00-00-00-00-00-00-00-00-00-00
            inet addr:10.56.65.12 P-t-P:10.56.65.12 Mask:255.255.255.0
            UP POINTOPOINT RUNNING NOARP MULTICAST  MTU:1500  Metric:1
            RX packets:19 errors:0 dropped:0 overruns:0 frame:0
            TX packets:33 errors:0 dropped:0 overruns:0 carrier:0
            collisions:0 txqueuelen:100
            RX bytes:6797 (6.7 KB)  TX bytes:4936 (4.9 KB)
At this point you can reboot your server to make sure that after is server is back you still see tun0 interface, if you do, your Internet connection is secure and entire traffic from the server that goes outside your LAN is pushed through encrypted connection to your VPN provider server.
 Install and Configure Jackett
Jackett is another service that act as a middleman between Torrent trackers and Sonarr or CouchPotato, it allows them to find relevant torrent files and puts them in to Torrent client for download - without that nothing will be downloaded automatically.
Install Jackett:
sudo apt-get install libcurl4-openssl-dev
sudo apt-get install mono-devel
Go in to https://github.com/Jackett/Jackett/releases/ and check latest release of Jackett, then replace below link with code version that is most recent on GitHub, in my case at present it is v0.7.1533. Go in to /root/ directory, download and unzip Jackett.Binaries.Mono.tar.gz as shown below.
cd /root/
wget -q https://github.com/Jackett/Jackett/releases/download/v0.7.1533/Jackett.Binaries.Mono.tar.gz
tar zxvf Jackett.Binaries.Mono.tar.gz
Make service out of it:
cat > jackett.service << EOF
[Unit]
Description=Jackett Daemon
After=network.target

[Service]
WorkingDirectory=/root/Jackett/
User=root
Restart=always
RestartSec=5
Type=simple
ExecStart=/usr/bin/mono /root/Jackett/JackettConsole.exe  --NoRestart
TimeoutStopSec=20

[Install]
WantedBy=multi-user.target
EOF
Enable and start Jackett:
sudo mv jackett.service /lib/systemd/system/jackett.service
sudo systemctl enable jackett
sudo systemctl start jackett
sudo systemctl status jackett
sudo apt-get update
Open http://localhost:9117 - you might see a warning message at the bottom of the page
To check mono version type mono --version, we should get it updated from 4.2 to 5.0 and Jacket should no longer display warning message.
maniuch@lds:~$ mono --version
Mono JIT compiler version 4.2.1 (Debian 4.2.1.102+dfsg2-7ubuntu4)
Copyright (C) 2002-2014 Novell, Inc, Xamarin Inc and Contributors. www.mono-project.com
Update Mono to 5.0:
sudo apt-key adv --keyserver hkp://keyserver.ubuntu.com:80 --recv-keys 3FA7E0328081BFF6A14DA29AA6A19B38D3D831EF
echo "deb http://download.mono-project.com/repo/ubuntu xenial main" | sudo tee /etc/apt/sources.list.d/mono-official.list
sudo apt-get install mono-complete
sudo apt-get update
sudo apt-get upgrade
Check Mono version again:
maniuch@lds:~$ mono --version
Mono JIT compiler version 5.0.1.1 (2017-02/5077205 Thu May 25 09:19:18 UTC 2017)
Copyright (C) 2002-2014 Novell, Inc, Xamarin Inc and Contributors. www.mono-project.com
Reload Jackett page, if Jackett still display warning message just restart jackett service
sudo systemctl stop jackett
sudo systemctl start jackett
Go to the Jackett configuration section at the bottom of the page or just continue installing remaining pieces reaching configuration section when all is installed first.
 Install and Configure Deluge
Deluge is a torrent client that I decided to use in this deployment. It will communicate with Sonarr, CouchPotato and Headphones receiving request for download and when download is completed these programs will move relevant files in to relevant folders on your disk. Downloaded files will be renamed and put in to appropriate folder structure, so you have all files properly named and located in relevant places not all over the place.
Install Deluge:
sudo touch /var/log/deluged.log
sudo touch /var/log/deluge-web.log
sudo chown root:root /var/log/deluge*

sudo apt install deluged
sudo apt install deluge-webui
sudo apt install deluge-console
Create Deluge service:
cat > deluged.service << EOF
[Unit]
Description=Deluge Bittorrent Client Daemon
After=network-online.target

[Service]
Type=simple
User=root
Group=root
UMask=077

ExecStart=/usr/bin/deluged -d

Restart=on-failure

# Configures the time to wait before service is stopped forcefully.
TimeoutStopSec=300

[Install]
WantedBy=multi-user.target
EOF
Enable and start service.
sudo mv deluged.service /lib/systemd/system/deluged.service
sudo systemctl enable deluged
sudo systemctl start deluged
sudo systemctl status deluged
Install Deluge web interface:
cat > deluged-web.service << EOF
[Unit]
Description=Deluge Bittorrent Client Web Interface
After=network-online.target

[Service]
Type=simple

User=root
Group=root
UMask=027

ExecStart=/usr/bin/deluge-web

Restart=on-failure

[Install]
WantedBy=multi-user.target
EOF
Enable and start web UI
sudo mv deluged-web.service /lib/systemd/system/deluged-web.service
sudo systemctl enable deluged-websudo systemctl start deluged-web
sudo systemctl status deluged-web
From any machine try to get to your Deluge web UI http://localhost:8112 if you not seeing any website maybe it is Ubuntu firewall that is blocking it - disable it while testing
sudo ufw disableTry again - if you see Password prompt put deluge as default password.
Go to the Deluge configuration section at the bottom of the page or just continue installing remaining pieces reaching configuration section when all is installed first.
 Install and Configure Sonarr
Sonarr.tv - is automation system that organize and tracks all what should be downloaded and does that when new episodes are available - it search torrent trackers and puts found torrents in to torrent client i.e. Deluge. When download is completed Sonnat changes file name and puts it in specific place on a disk. https://sonarr.tv/
Installation - https://github.com/Sonarr/Sonarr/wiki/Installation
sudo apt-key adv --keyserver keyserver.ubuntu.com --recv-keys FDA5DFFC
echo "deb http://apt.sonarr.tv/ master main" | sudo tee /etc/apt/sources.list.d/sonarr.list
sudo apt-get install nzbdrone
Test that you can start Sonar manually:
mono --debug /opt/NzbDrone/NzbDrone.exeYou can also try to access web UI http://localhost:8989 to see if Sonarr web UI is available.
Let’s make Sonarr start automatically after reboot:
cat > sonarr.service << EOF
[Unit]
Description=Sonarr Daemon
After=syslog.target network.target

[Service]
User=root
Group=root

Type=simple
ExecStart=/usr/bin/mono /opt/NzbDrone/NzbDrone.exe -nobrowser
TimeoutStopSec=20
KillMode=process
Restart=on-failure

[Install]
WantedBy=multi-user.target
EOF
Create Sonarr service:
sudo mv sonarr.service /lib/systemd/system/sonarr.service
systemctl enable sonarr.service
systemctl start sonarr.service
systemctl status sonarr.service
Later on when you will be trying to add any torrent indexer in Sonarr from Jackett you might get an error regarding SSL certificates, so to avoid it we can do some adjustment now so you don’t have to wonder what happened later.
Error message when testing indexers in Sonarr:
Workaround:
sudo apt-get install ca-certificates
sudo apt-get install openssl

sudo cat /etc/ssl/certs/*.pem > /tmp/ca-certs.pem
sudo cert-sync /tmp/ca-certs.pem
sudo rm /tmp/ca-certs.pem
Go to the Sonarr configuration section at the bottom of the page or just continue installing remaining pieces reaching configuration section when all is installed first.
 Install and Configure Radarr
Radarr is a fork of Sonarr with the difference that this one is for movies not for serials, This development is claiming space of CouchPotato which is used for that exact purpose. So you can choose to use Radarr or CouchPotato but you can install both if you wish and use one of them.
Install Radarr https://github.com/Radarr/Radarr/wiki/Installation If link does not work search GitHub for Radarr
Download and extract the latest release from github, changing the url below to match.
cd /root/
wget -q https://github.com/Radarr/Radarr/releases/download/v0.2.0.870/Radarr.develop.0.2.0.870.linux.tar.gz
tar zxvf Radarr.develop.0.2.0.870.linux.tar.gz -C /opt/
Create Radarr service:
cat > radarr.service << EOF
[Unit]
Description=Radarr Daemon
After=syslog.target network.target

[Service]
User=root
Group=root
Restart=always
RestartSec=5
Type=simple

ExecStart=/usr/bin/mono --debug /opt/Radarr/Radarr.exe --nobrowser
TimeoutStopSec=20
KillMode=process

[Install]
WantedBy=multi-user.target
EOF
Start Radar Service
sudo mv radarr.service /lib/systemd/system/radarr.service
systemctl enable radarr.service
systemctl start radarr.service
systemctl status radarr.service
Radarr is now installed as a service set to auto start, check that it is running by opening http://localhost:7878 in your browser. If the web-ui opens and works, installation is complete.
 Install and Configure Headphones
Install headphones https://github.com/rembo10/headphones
cd ~
git clone https://github.com/rembo10/headphones.git
cd ~
Create a configuration file
cat > ~/.headphones << EOF
[General]
http_port = 1234

# 0.0.0.0 allows outside connections. Use 'localhost' to restrict
http_host = 0.0.0.0
EOF
Create Headphones service:
cat > headphones.service << EOF
[Unit]
Description=Headphones Daemon
After=network.target

[Service]
User=root
Restart=always
RestartSec=5
Type=simple
ExecStart=/usr/bin/python /root/headphones/Headphones.py --config /root/.headphones
TimeoutStopSec=20

[Install]
WantedBy=multi-user.target
EOF
Enable and start it
sudo mv headphones.service /lib/systemd/system/headphones.service
sudo systemctl enable headphones
sudo systemctl start headphones
sudo systemctl status headphones
open>http://localhost:1234
 Mount Network SMB Share
If you like me, keeping your storage separate from computing by i.e. having some network shared storage I am sure you would like this system to move completed downloads to appropriate folder structure on NAS. In order for LDS to copy downloaded files in to a shared volume, from where i.e. Kodi will be pulling data for streaming, you have to map shared volume to LDS like shown below.
Install SMB utilities:
sudo apt-get install cifs-utilsCreate folders that system will use for mappings:
sudo mkdir /mnt/Serials
sudo mkdir /mnt/Music
If your share require authentication, create file that will hold username and password this is required to access network share:
sudo nano ~/smbcredentials
Enter your Windows username and password in the file:
username=msusername
password=mspassword
Change the permissions of the file to prevent unwanted access to your credentials:
chmod 600 ~/smbcredentialsThen edit your /etc/fstab file (with root privileges) to add lines:
//192.168.11.77/Multimedia /mnt/Multimedia cifs iocharset=utf8,credentials=/root/smbcredentials,uid=1000 0 0
//192.168.11.45/DownloadsTmp /mnt/DownloadsTmp cifs iocharset=utf8,credentials=/root/smbcredentials,uid=1000 0 0
Save the file, exit the editor.
Finally, test the fstab entry by issuing:
sudo mount -a
If there are no errors, you should test how it works after a reboot. Your remote share should mount automatically.
Configure Jackett
Open http://localhost:9117 - Replace localhost with IP address of the server where you installed Jackett.
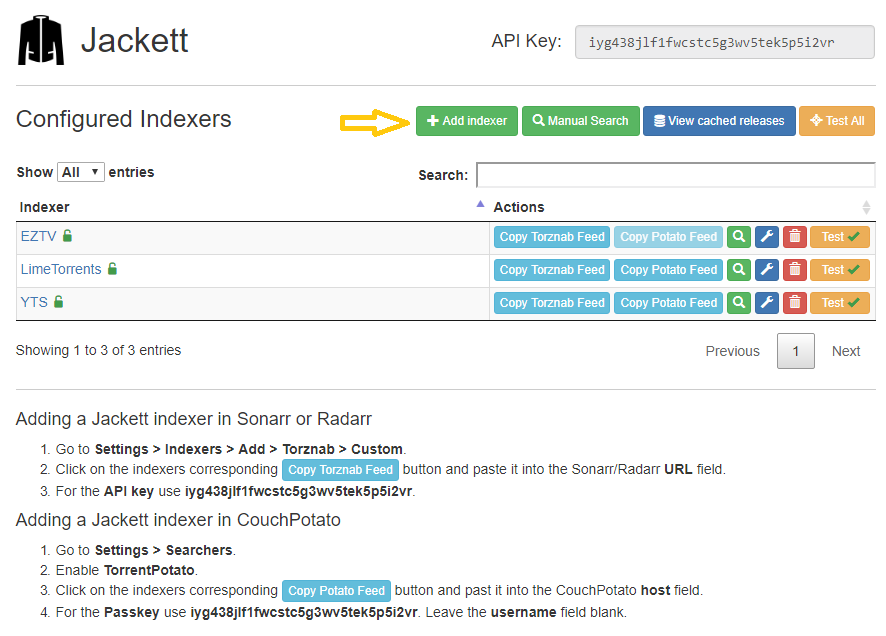
After successful connection to Jackett web page, You should get something like shown on the picture below, currently with no indexers configured, and all what you need to do is to add couple of indexer records that we will use later on with Sonarr, Radarr and Headphones to search for available torrent files.
Just select +Add Indexer
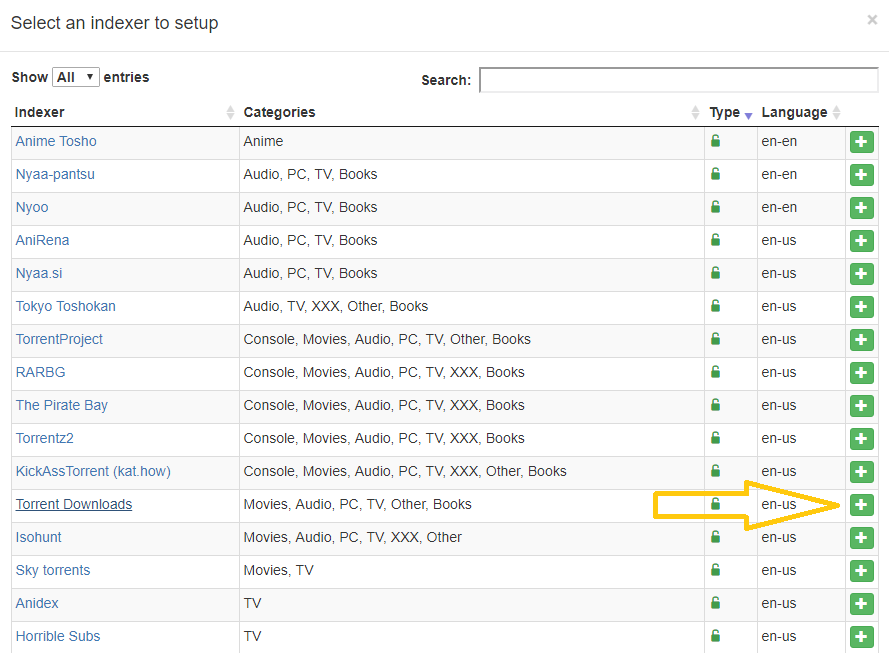
Find Torrent provider you like and click + to add indexer to Jackett.
Bear in mind that most of the indexers require account and in order to use them you need to be a member on indexer web site.
Select Torrent provider that has few Categories available therefore you can use just one for i.e. Serials, Movies and Music.
Green padlock under Type usually mean you can use torrent provider with no additional registration, but check to be sure.
If you cannot find your usual Torrent provider it means it has no API that work with Jackett
and cannot be added. For test use one of the unlocked providers, later on you can add more if needed.
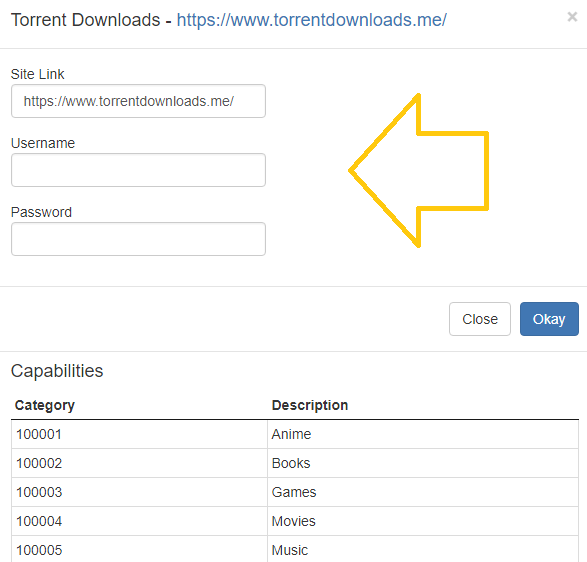
If selected Torrent provider require an account you will see prompt to put your credentials while added it to Jackett.
When you successfully add one or more indexers test them, all together or each one separately, you want to see green tick against indexer you selected - what means that API is working properly and you should be able to use it with i.e. Sonarr later on.
When your Jackett configuration looks similar to the one shown on first picture above you are ready to go, keep Jackett web page open as you will need some information from it later on.
Configure Deluge
Open Deluge web UI http://localhost:8112
- Replace localhost with IP address of the server where you installed Deluge.
Log in using default password deluge.
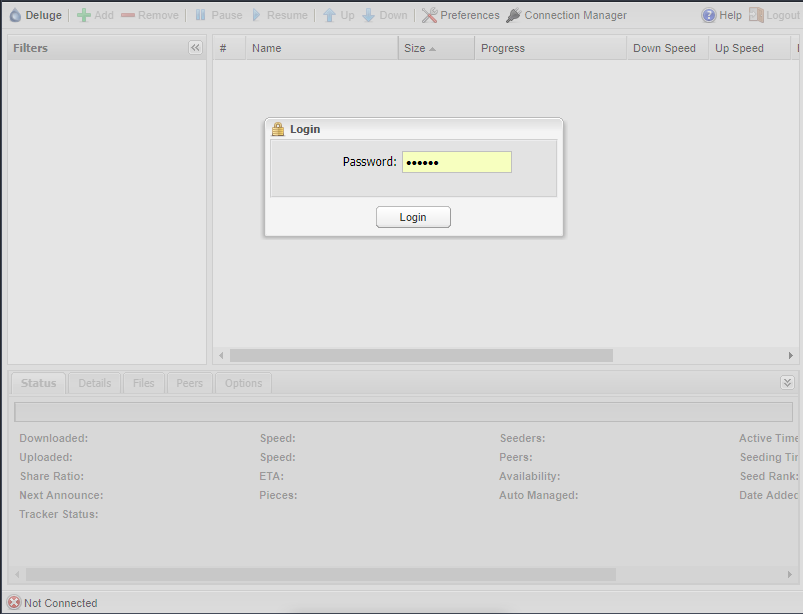
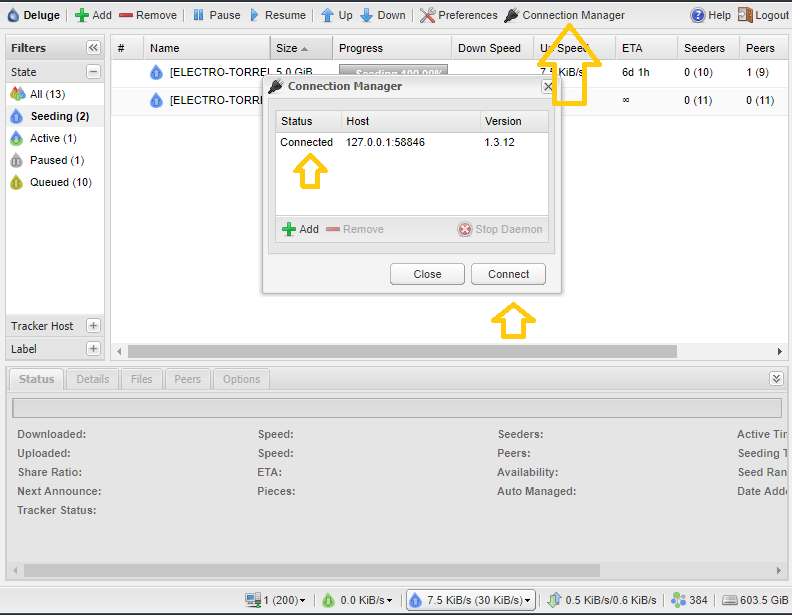
Check if you are connected to deluge daemon, if online/offline just select and click Connect. Deluge should connect to Web UI service by default but sometimes it does not work, usually after server reboot.
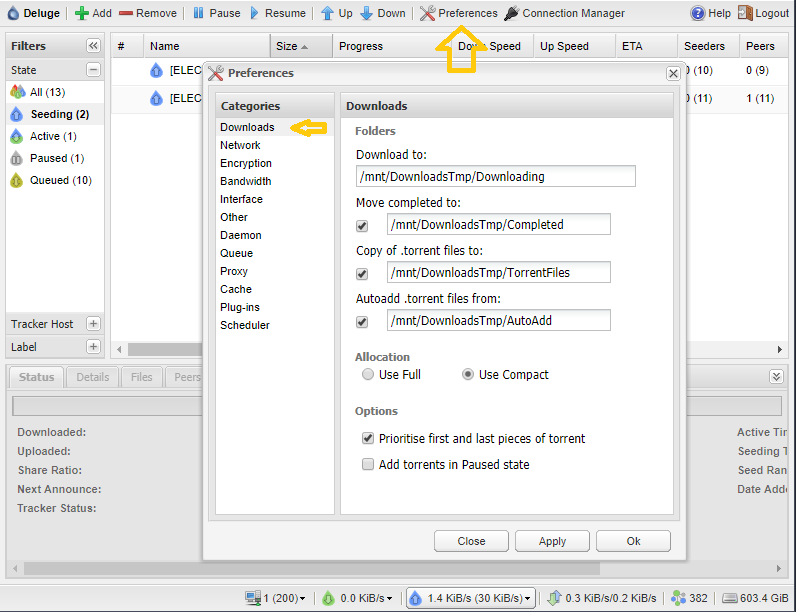
Below few settings that I modify to match my preferences pushing all downloads to remote storage (SAMBA shared CIFs), you can store all locally but in my case this server is only to operate as a node for downloading where all the downloaded resources are kept remotely so nothing is lost when server is down, paused or power off - data are still available to home entertainment system like Kodi.
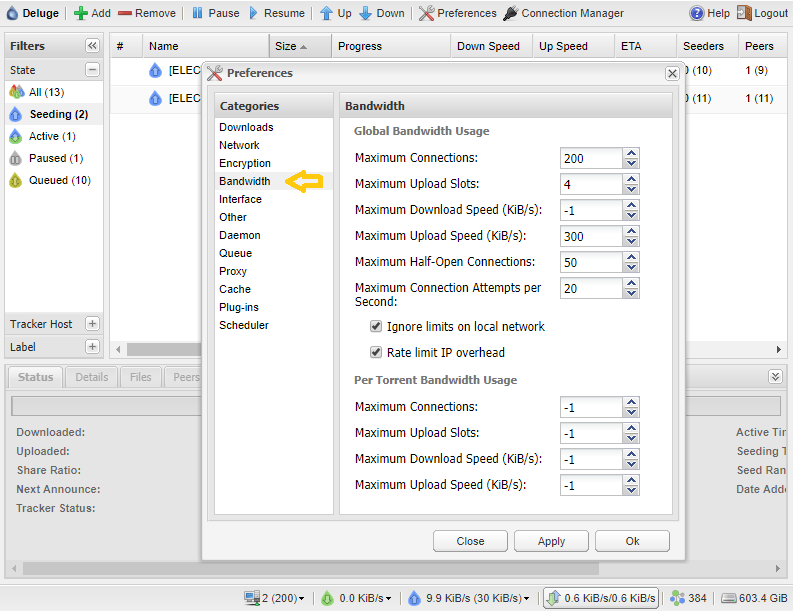
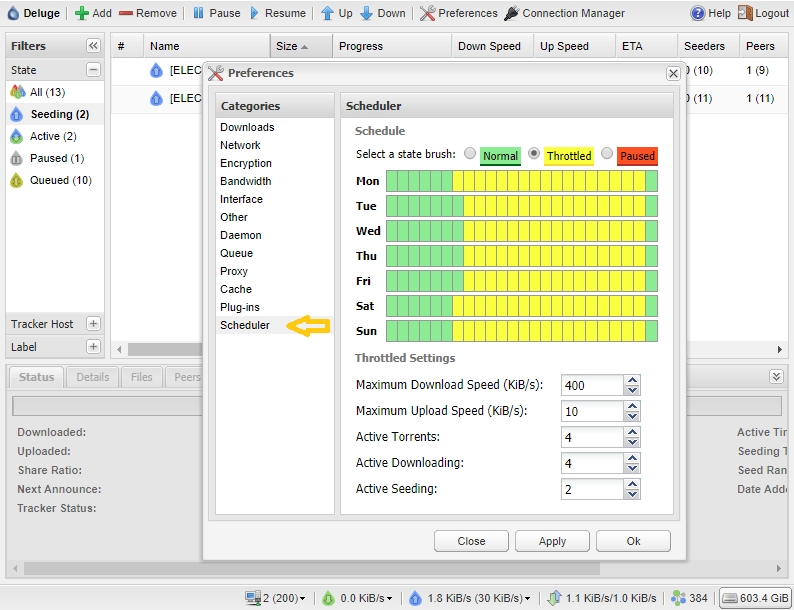
Bandwidth settings - limit them as you like globally, I also use a plugging that limits these values even more. There are different values during the day are different during nigh time - see last picture in this section.
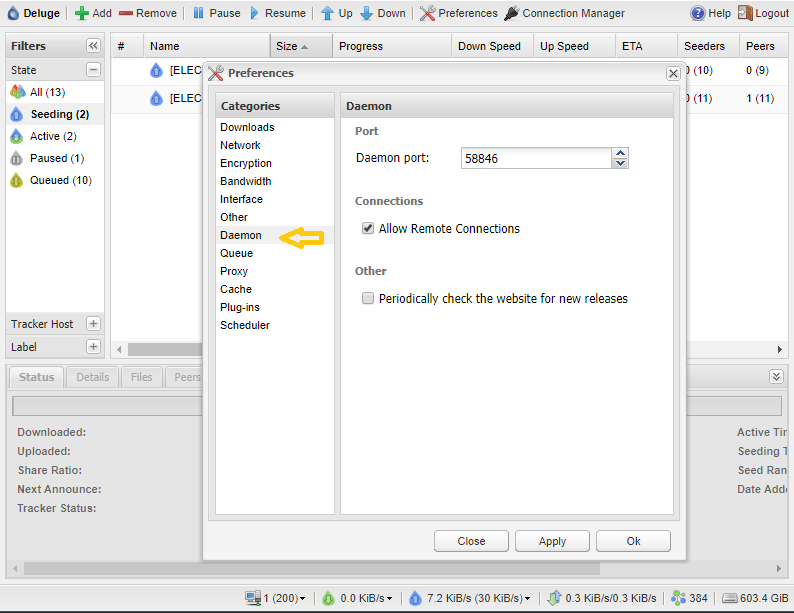
Daemon section - leve port as default and enable remote connection it will be needed later.
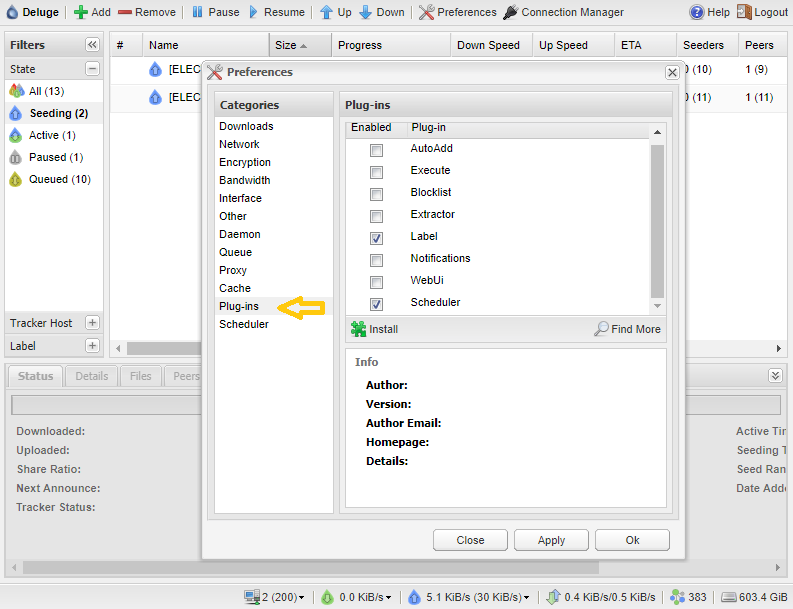
Plugins - I use only two as you see below.
Scheduler - allows you to limit bandwidth depending on the time of the day - it overrides global settings if set higher.
Configure Sonarr
Access Sonarr Web UI http://localhost:8989
- Replace localhost with IP address of the server where you installed Sonarr.
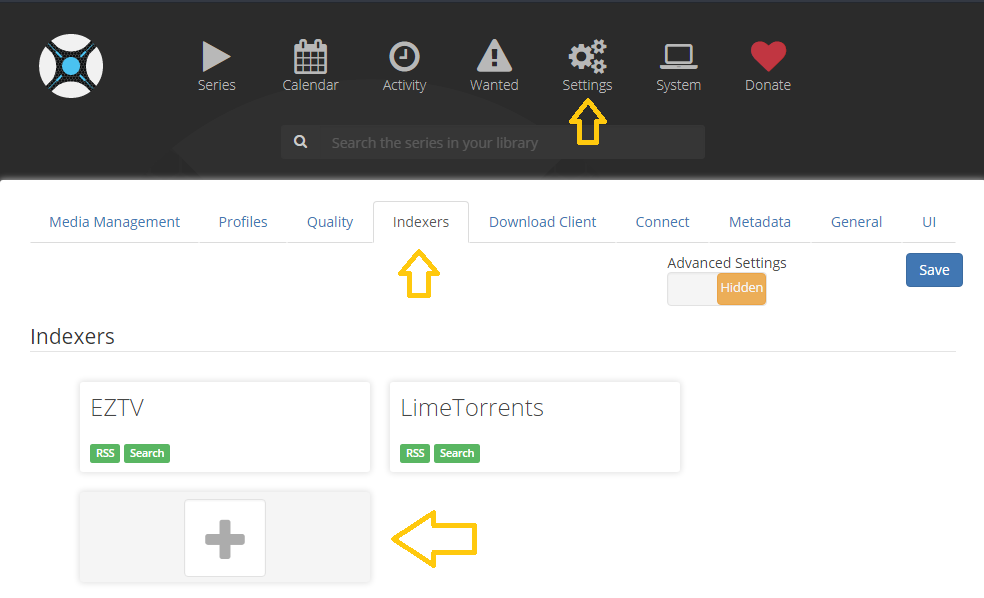
Navigate to Settings / Indexers (you should have no Indexers configured yet), Click on the big + sign.
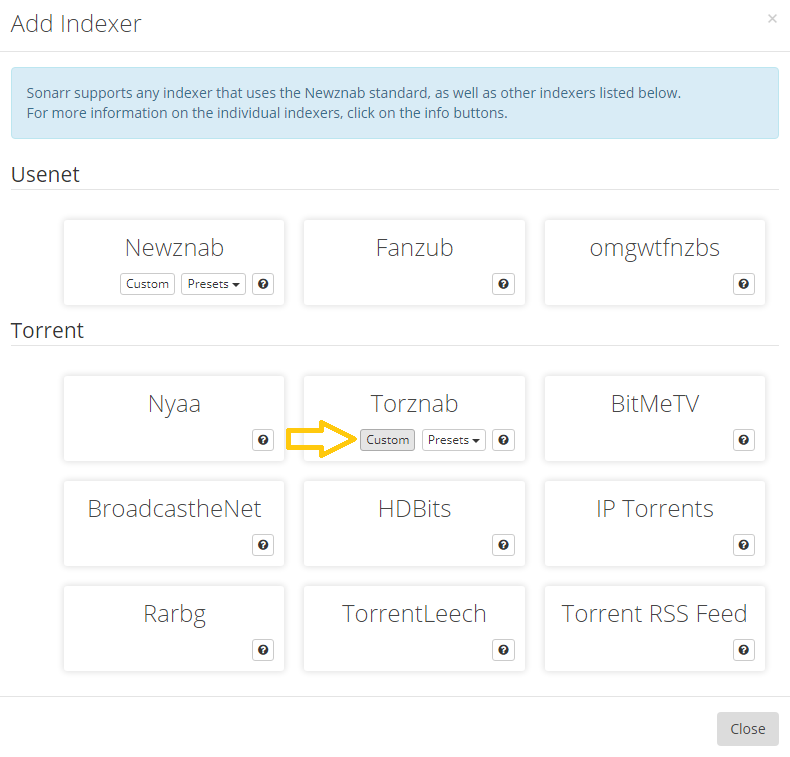
Under Torrent section select Torznab - Custom
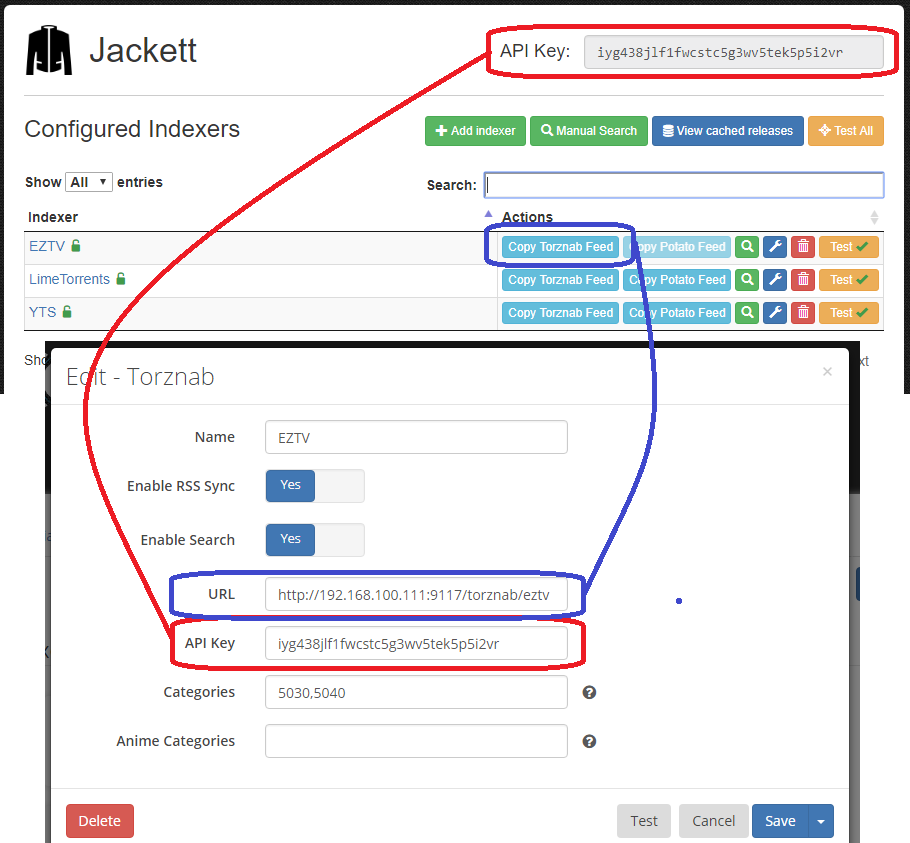
Now we need some information from Jackett that we configured earlier.
First give Sonarr Indexer a name (I use the same name that I configured Jackett indexer with).
In URL field paste link copied from Jackett as shown below.
In API Key paste string value from Jackett API Key as shown below.
After setting a Name, URL and API Key leave all remaining fields as default and hit Test button at the bottom, after few seconds you should see at the bottom of the screen Sonarr reporting that it can communicate with Indexer what essentially means that both programs work together now.
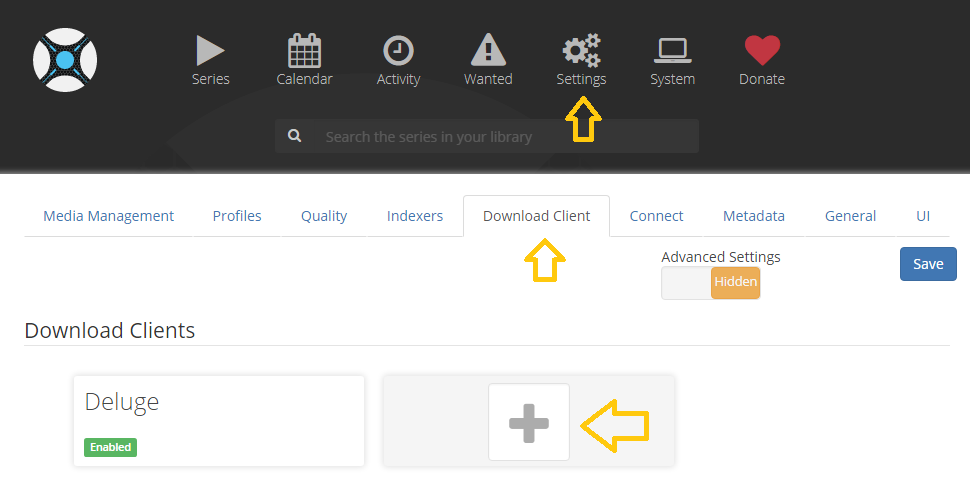
Now let's add Download Client - in our case Deluge that we installed earlier.
Simply select Settings - Download Client and again press big + sign.
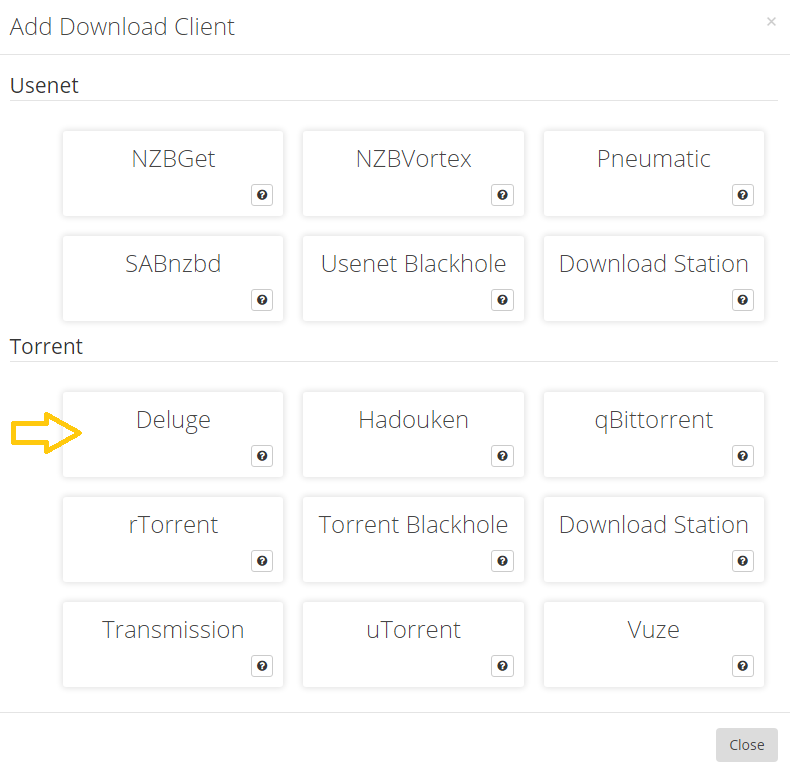
Under Torrent section select Deluge
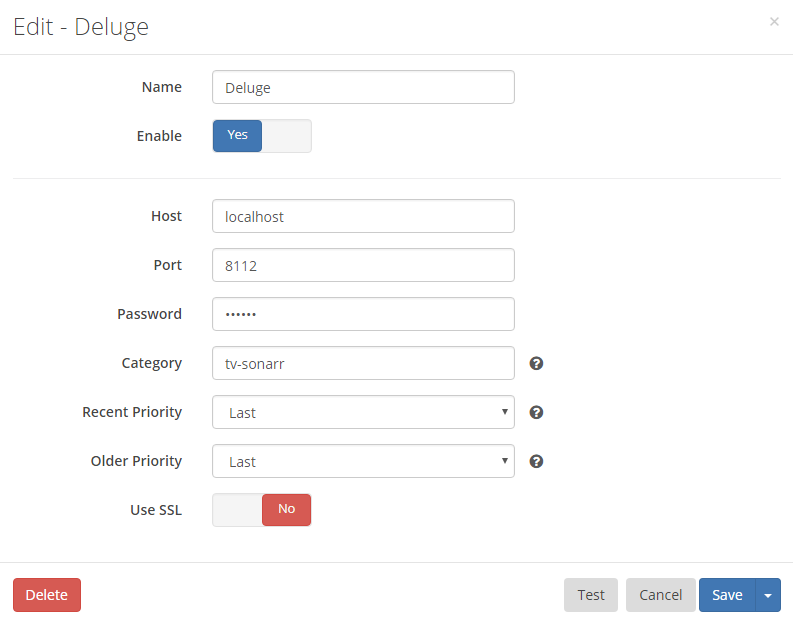
At this point only what is needed is a Name (I called it Deluge).
Leave all the other settings default and hit that Test button to check if Sonarr can comunicate with Deluge.
As you see there is also an option to use Usenet network instead of Torrent one but I wont be explaining what is it and how to use it, I am sure you will be able to find plenty information on that subject elsewhere.
I wont be explaining how to configure Raddar as this is exactly the same as above Sonarr configuration, to be hones all look the same.
Headphones configuration is little more time consuming and I will leave it for another time.
I hope above will be enough for you to discover what this system does and what you can do with it yourself.

Help me make LMDS better
With your support anything is possible
- Beginner
- Objectives
- Concept
- Hardware
- Hypervisor
- Hypervisor Manager
- Hypervisor Initial Config to be continued...
- Advanced
- My Quiet Lab
- Active
- Depreciated

Build your own Audiobook streaming system
Article will show you how to build Audible like streaming system based on Booksonic - audiobook streaming server and Subsonic phone app that let you listen audiobooks online anywhere you are.
Go to article